
Life's a garden. Dig it.
For the love of God, DO NOT skip the section on setting up the Firebase Emulator. Using the Emulator effectively will save you more time and headaches than anything else.
1. Create a Firebase Project
Actually, we're going to create two, separate Firebase projects:
- abc-corp-dev
- abc-corp-prod
abc-corp-dev will be our development environment, where we can experiment and test new features. abc-corp-prod will be our production environment for real, live users.
-
Create a new project from the Firebase Console. I recommend naming your projects using kebab-case, with the suffix
-devand-prod. -
Deselect "Enable Google Analytics for this project". You can enable it later, if necessary.
-
Create a web app inside the project. Don't worry too much about the name - you can change it later.
Ignore the CLI and Web SDK installation instructions. We'll review them soon!
Here's a video of this process for abc-corp-prod.
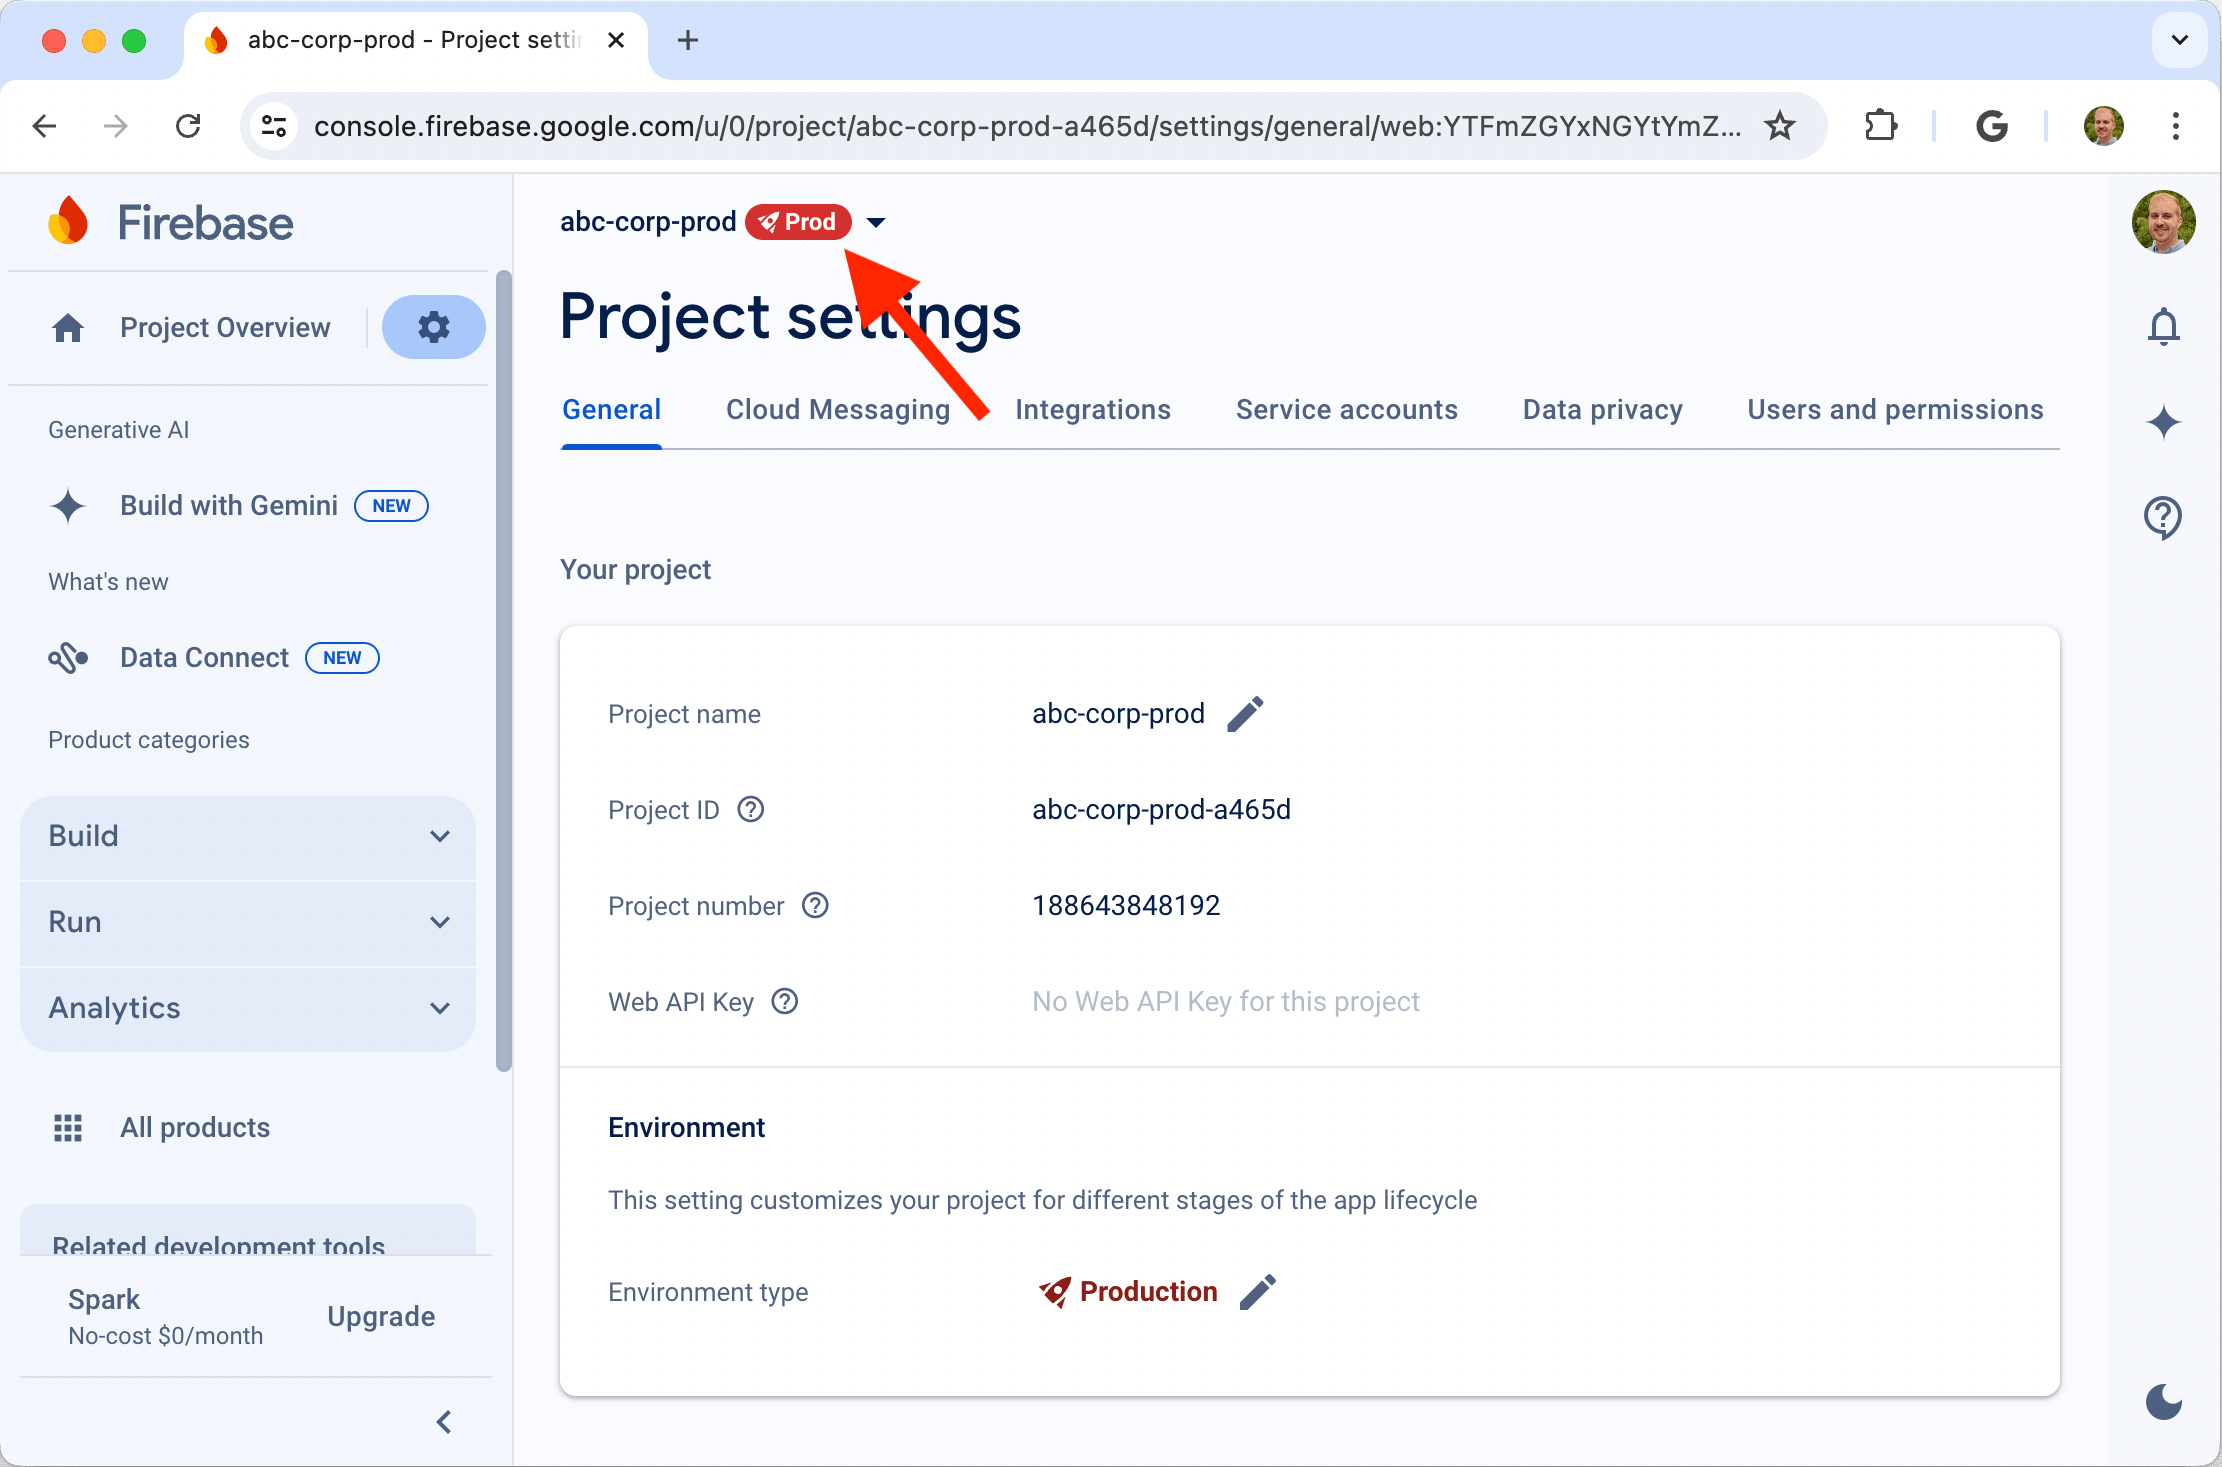
Label your prod project!
In the project settings, you can label a project as a production environment.
Project Settings > General > Environment > Production
This gives it a distinctive red label, to help you recognize when you're viewing and editing the prod project.
2. Install the Firebase CLI
Follow the instructions here to install the Firebase Command Line Interface (CLI). There are multiple ways to install the CLI. Here's the one I use 👇
$ npm install -g firebase-toolsAfter the CLI installs, run
$ firebase loginand follow the prompts to login.
How do I know if the Firebase CLI is already installed on my machine?
Run the following command in your Terminal.
$ firebase --versionIf it doesn't return a version number, it's (probably) not installed.
How do I know which version of the Firebase CLI is installed on my machine?
Again, run the following command in your Terminal.
$ firebase --versionWhat's the current version of the Firebase CLI?
You can always check the current version on NPM. As of 2024-07-29, the current version is 13.14.2.
How do I update my version of the Firebase CLI?
$ npm install -g firebase-tools3. Add the Web SDK to your Next.js project
When you created the web app in Step 1, Firebase gave you some instructions for adding the Web SDK. If you skipped that screen, no worries! You can find the same instructions at
Project Settings > General > Your apps > My web app > npm
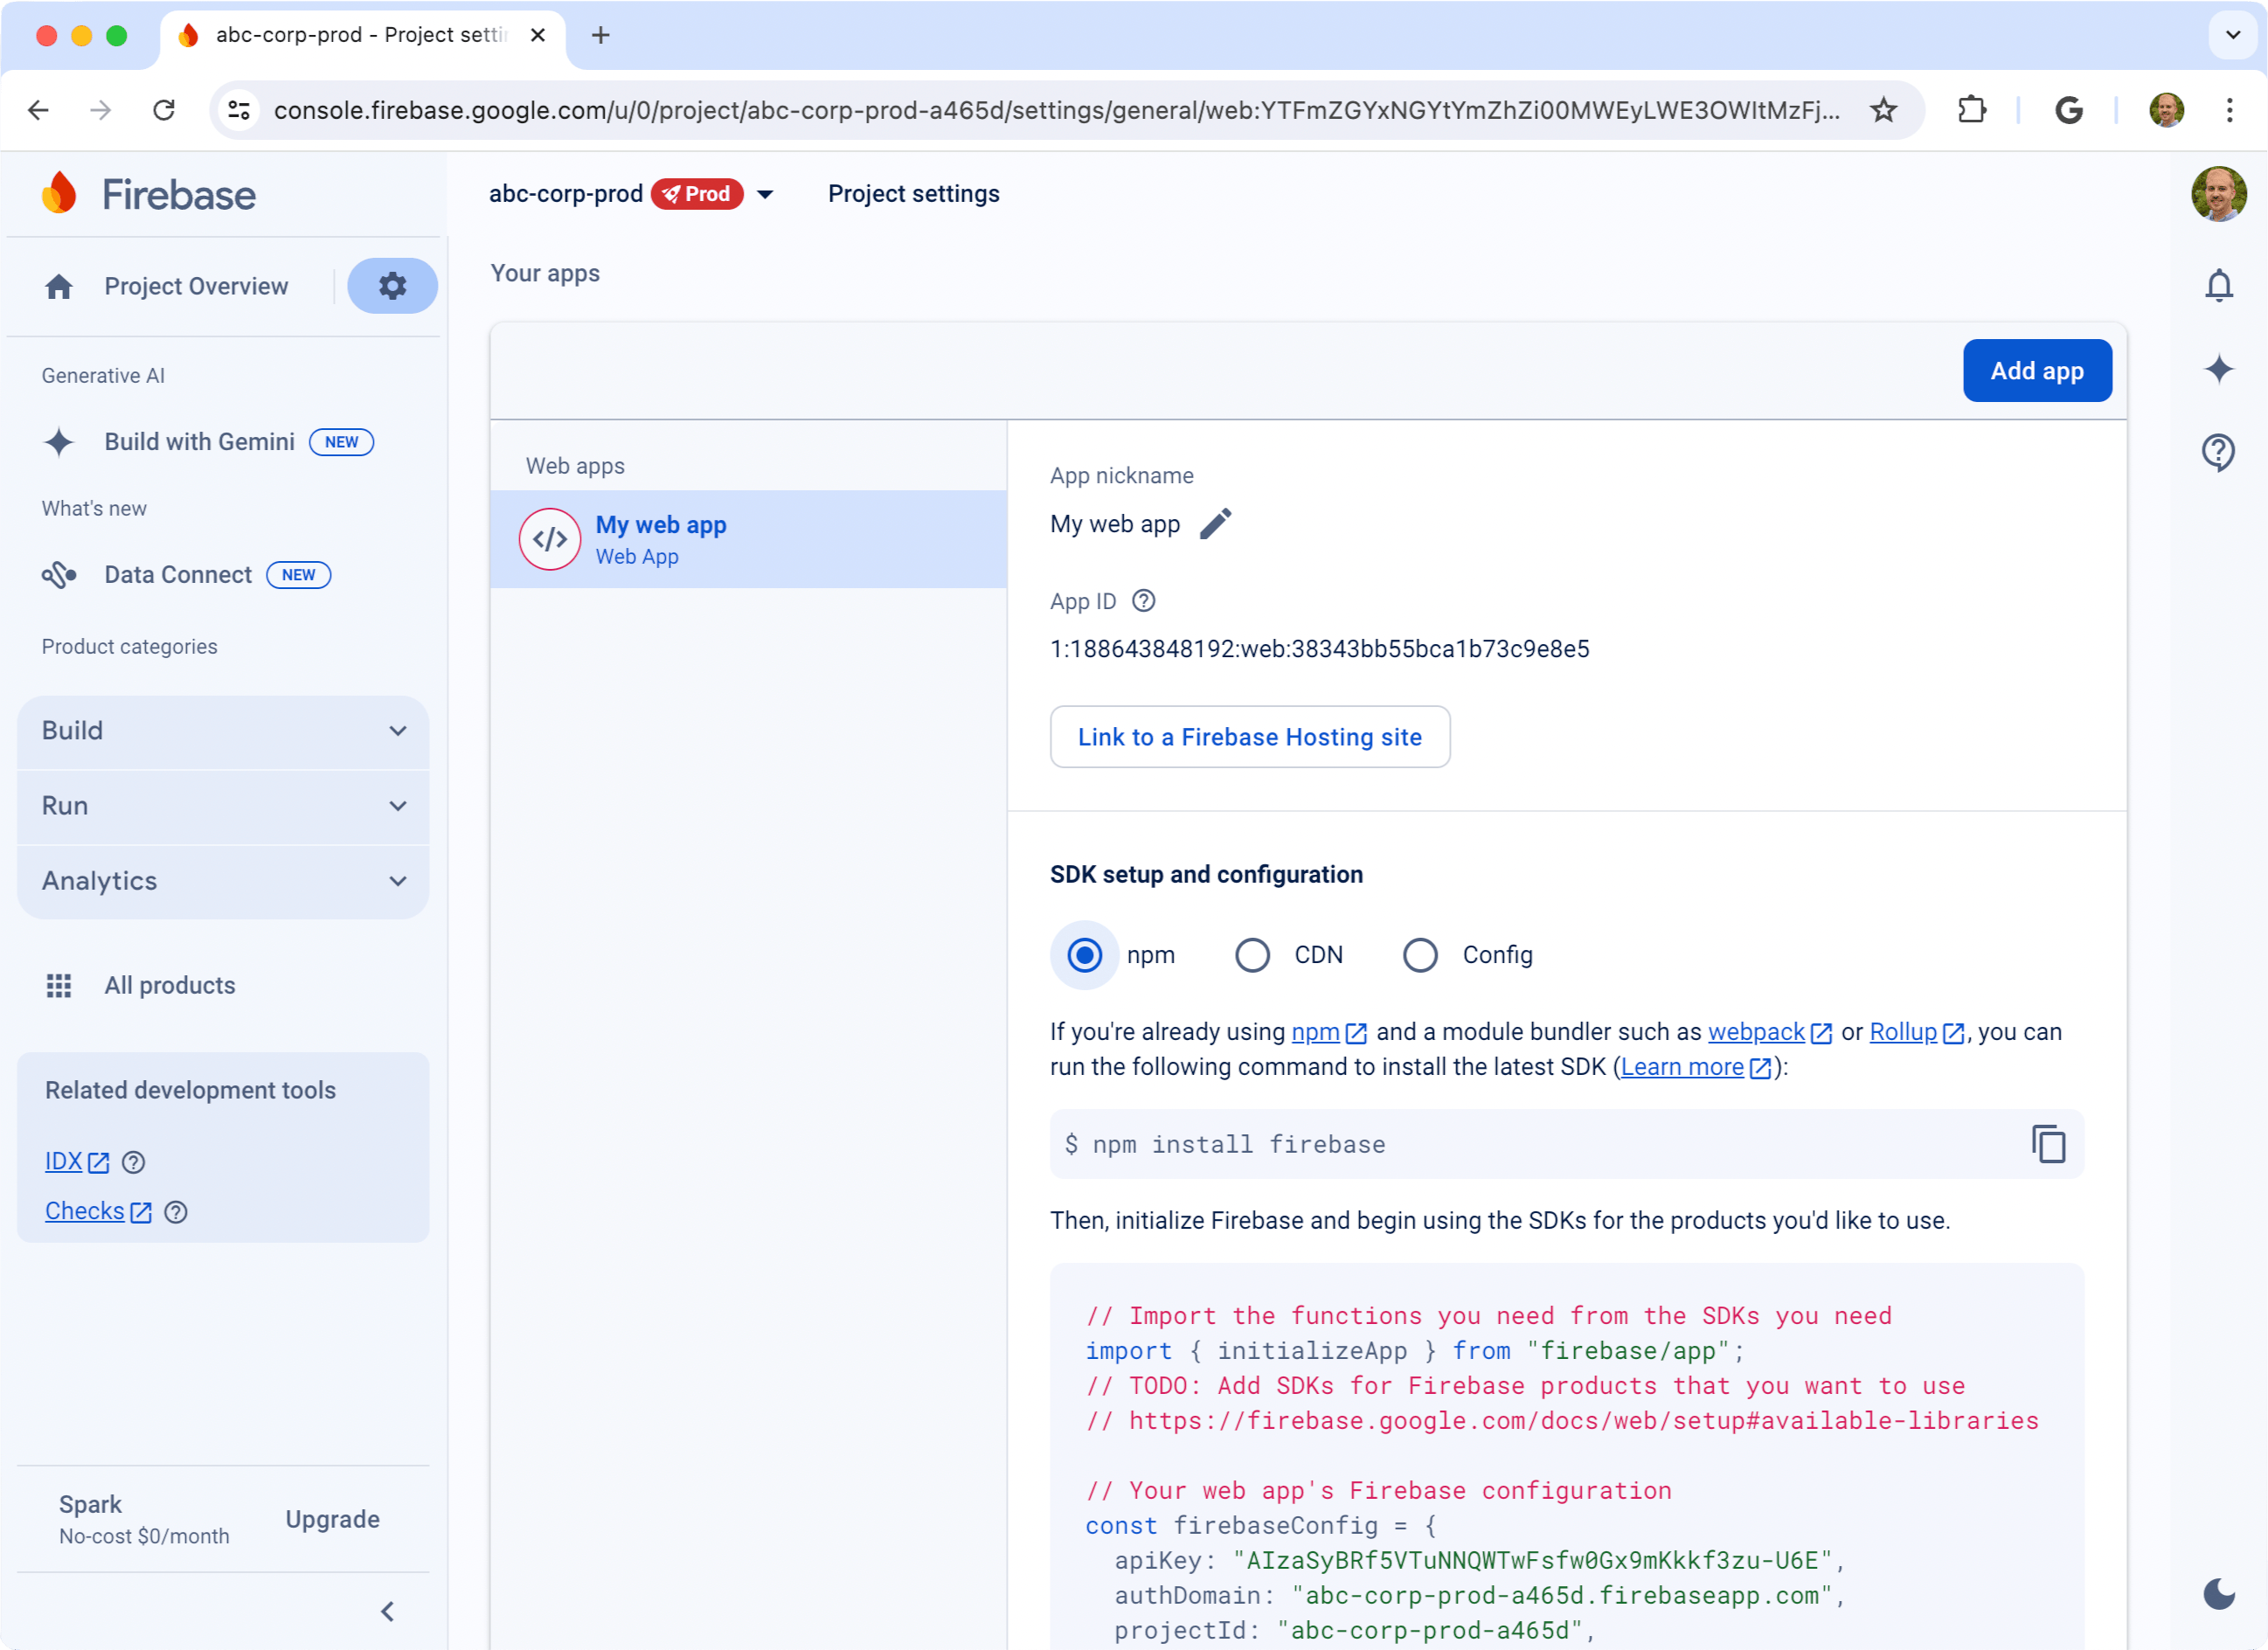
-
Install firebase from npm.
$ npm install firebaseRun this from the working directory: abc-corp-app/ -
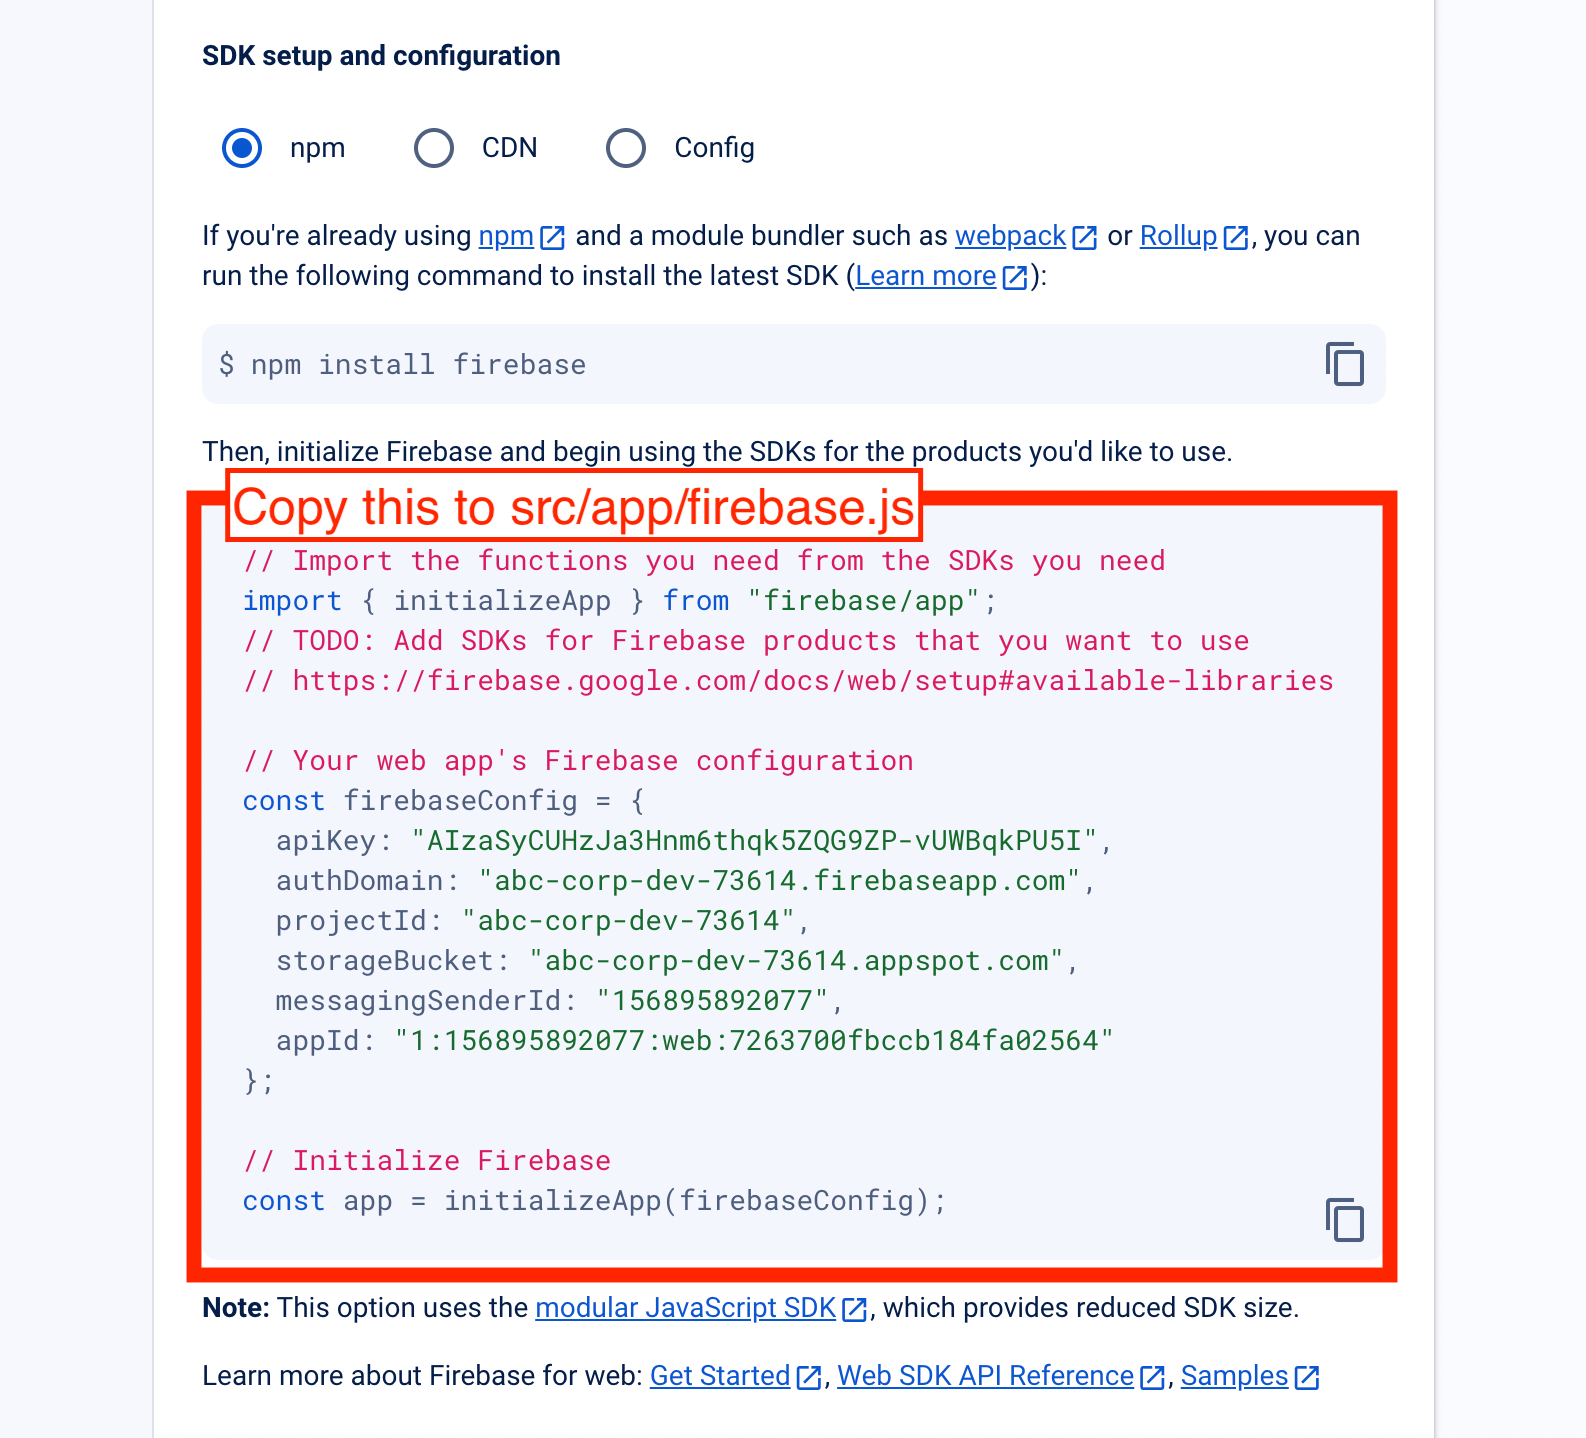
Create a file
abc-corp-app/src/app/firebase.js, then copy the SDK configuration code into it.Should I use abc-corp-dev or abc-corp-prod ?
Either one is fine. Soon, we'll make the project dynamic so that we can easily switch between dev and prod.
abc-corp-app
├── .env.development
├── .env.production
├── .eslintrc.json
├── .git
│   └── ...
├── .gitignore
├── .vscode
│   ├── settings.json
│   └── tasks.json
├── README.md
├── jsconfig.json
├── next.config.mjs
├── package-lock.json
├── package.json
├── postcss.config.mjs
├── public
│   ├── next.svg
│   └── vercel.svg
├── src
│   └── app
│       ├── favicon.ico
│       ├── firebase.js
│       ├── globals.css
│       ├── layout.js
│       └── page.js
└── tailwind.config.js
import { initializeApp } from "firebase/app" const firebaseConfig = { apiKey: "AIzaSyCsYcpPn8qUo0cqrsMTKy_1GBNaiqDaUUg", authDomain: "scipress-dev.firebaseapp.com", projectId: "scipress-dev", storageBucket: "scipress-dev.appspot.com", messagingSenderId: "720737082843", appId: "1:720737082843:web:4586505a755f4bc6515bfe", } // Initialize Firebase const app = initializeApp(firebaseConfig) -
Replace the hard-coded values in
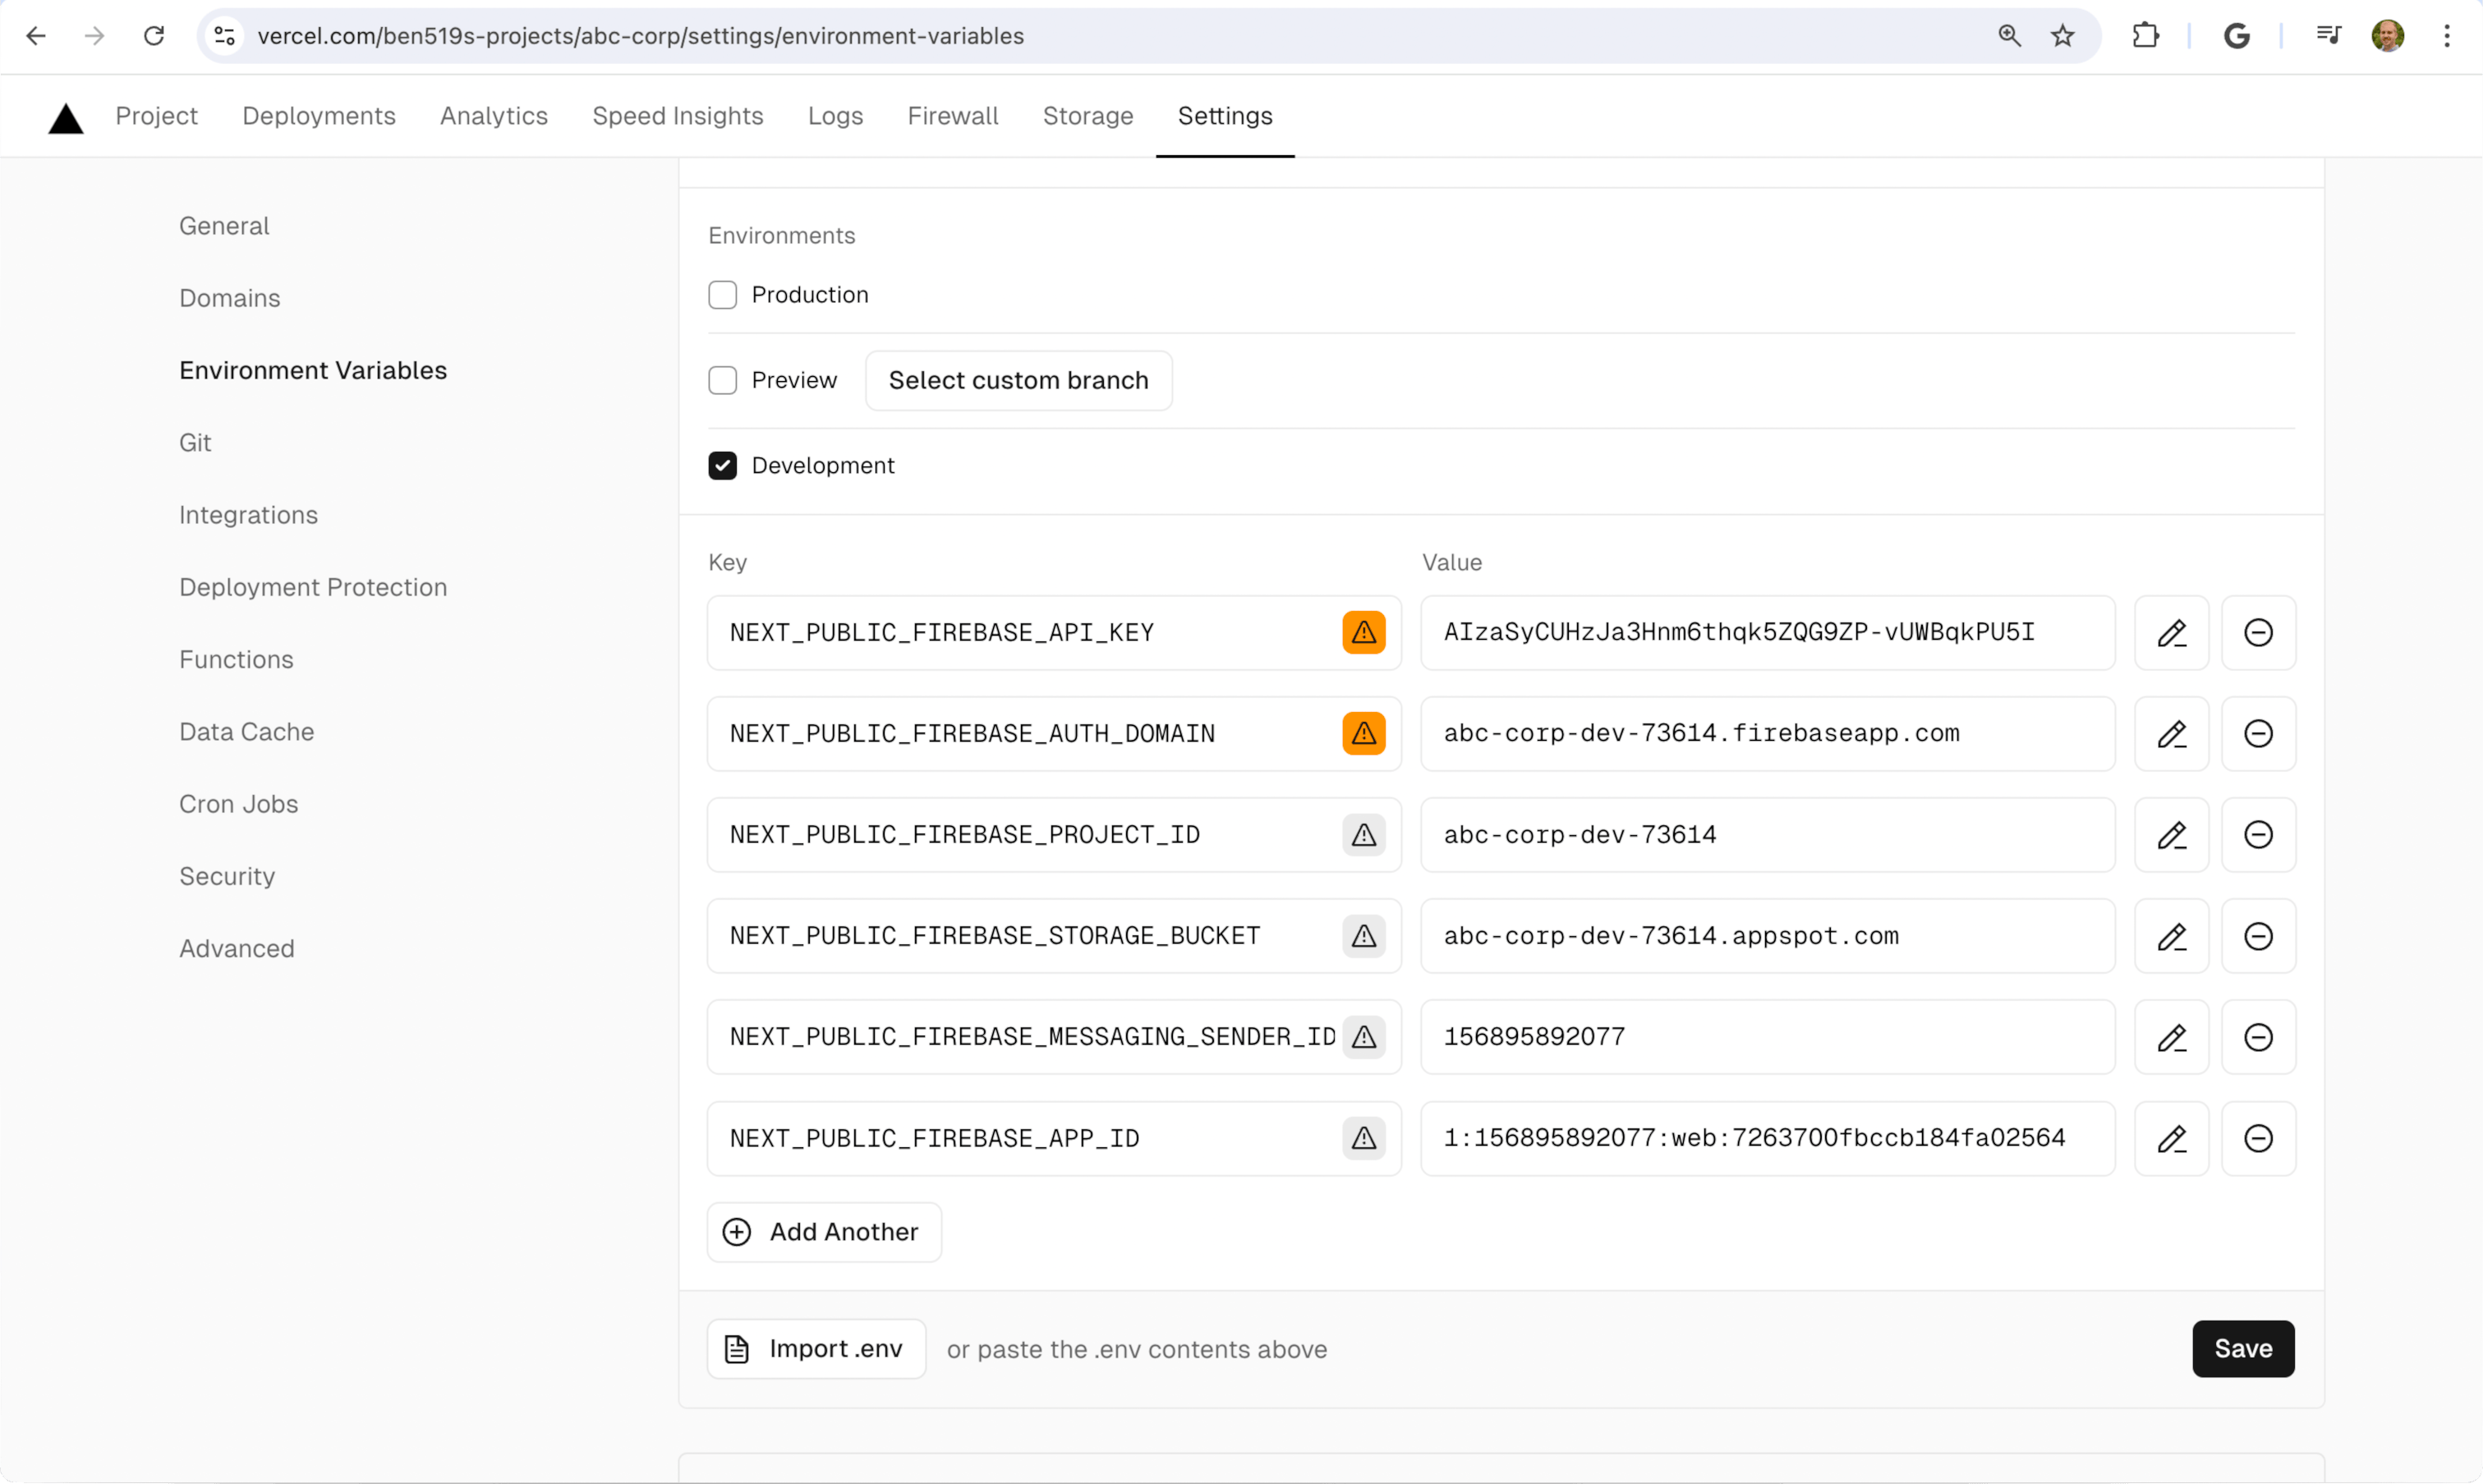
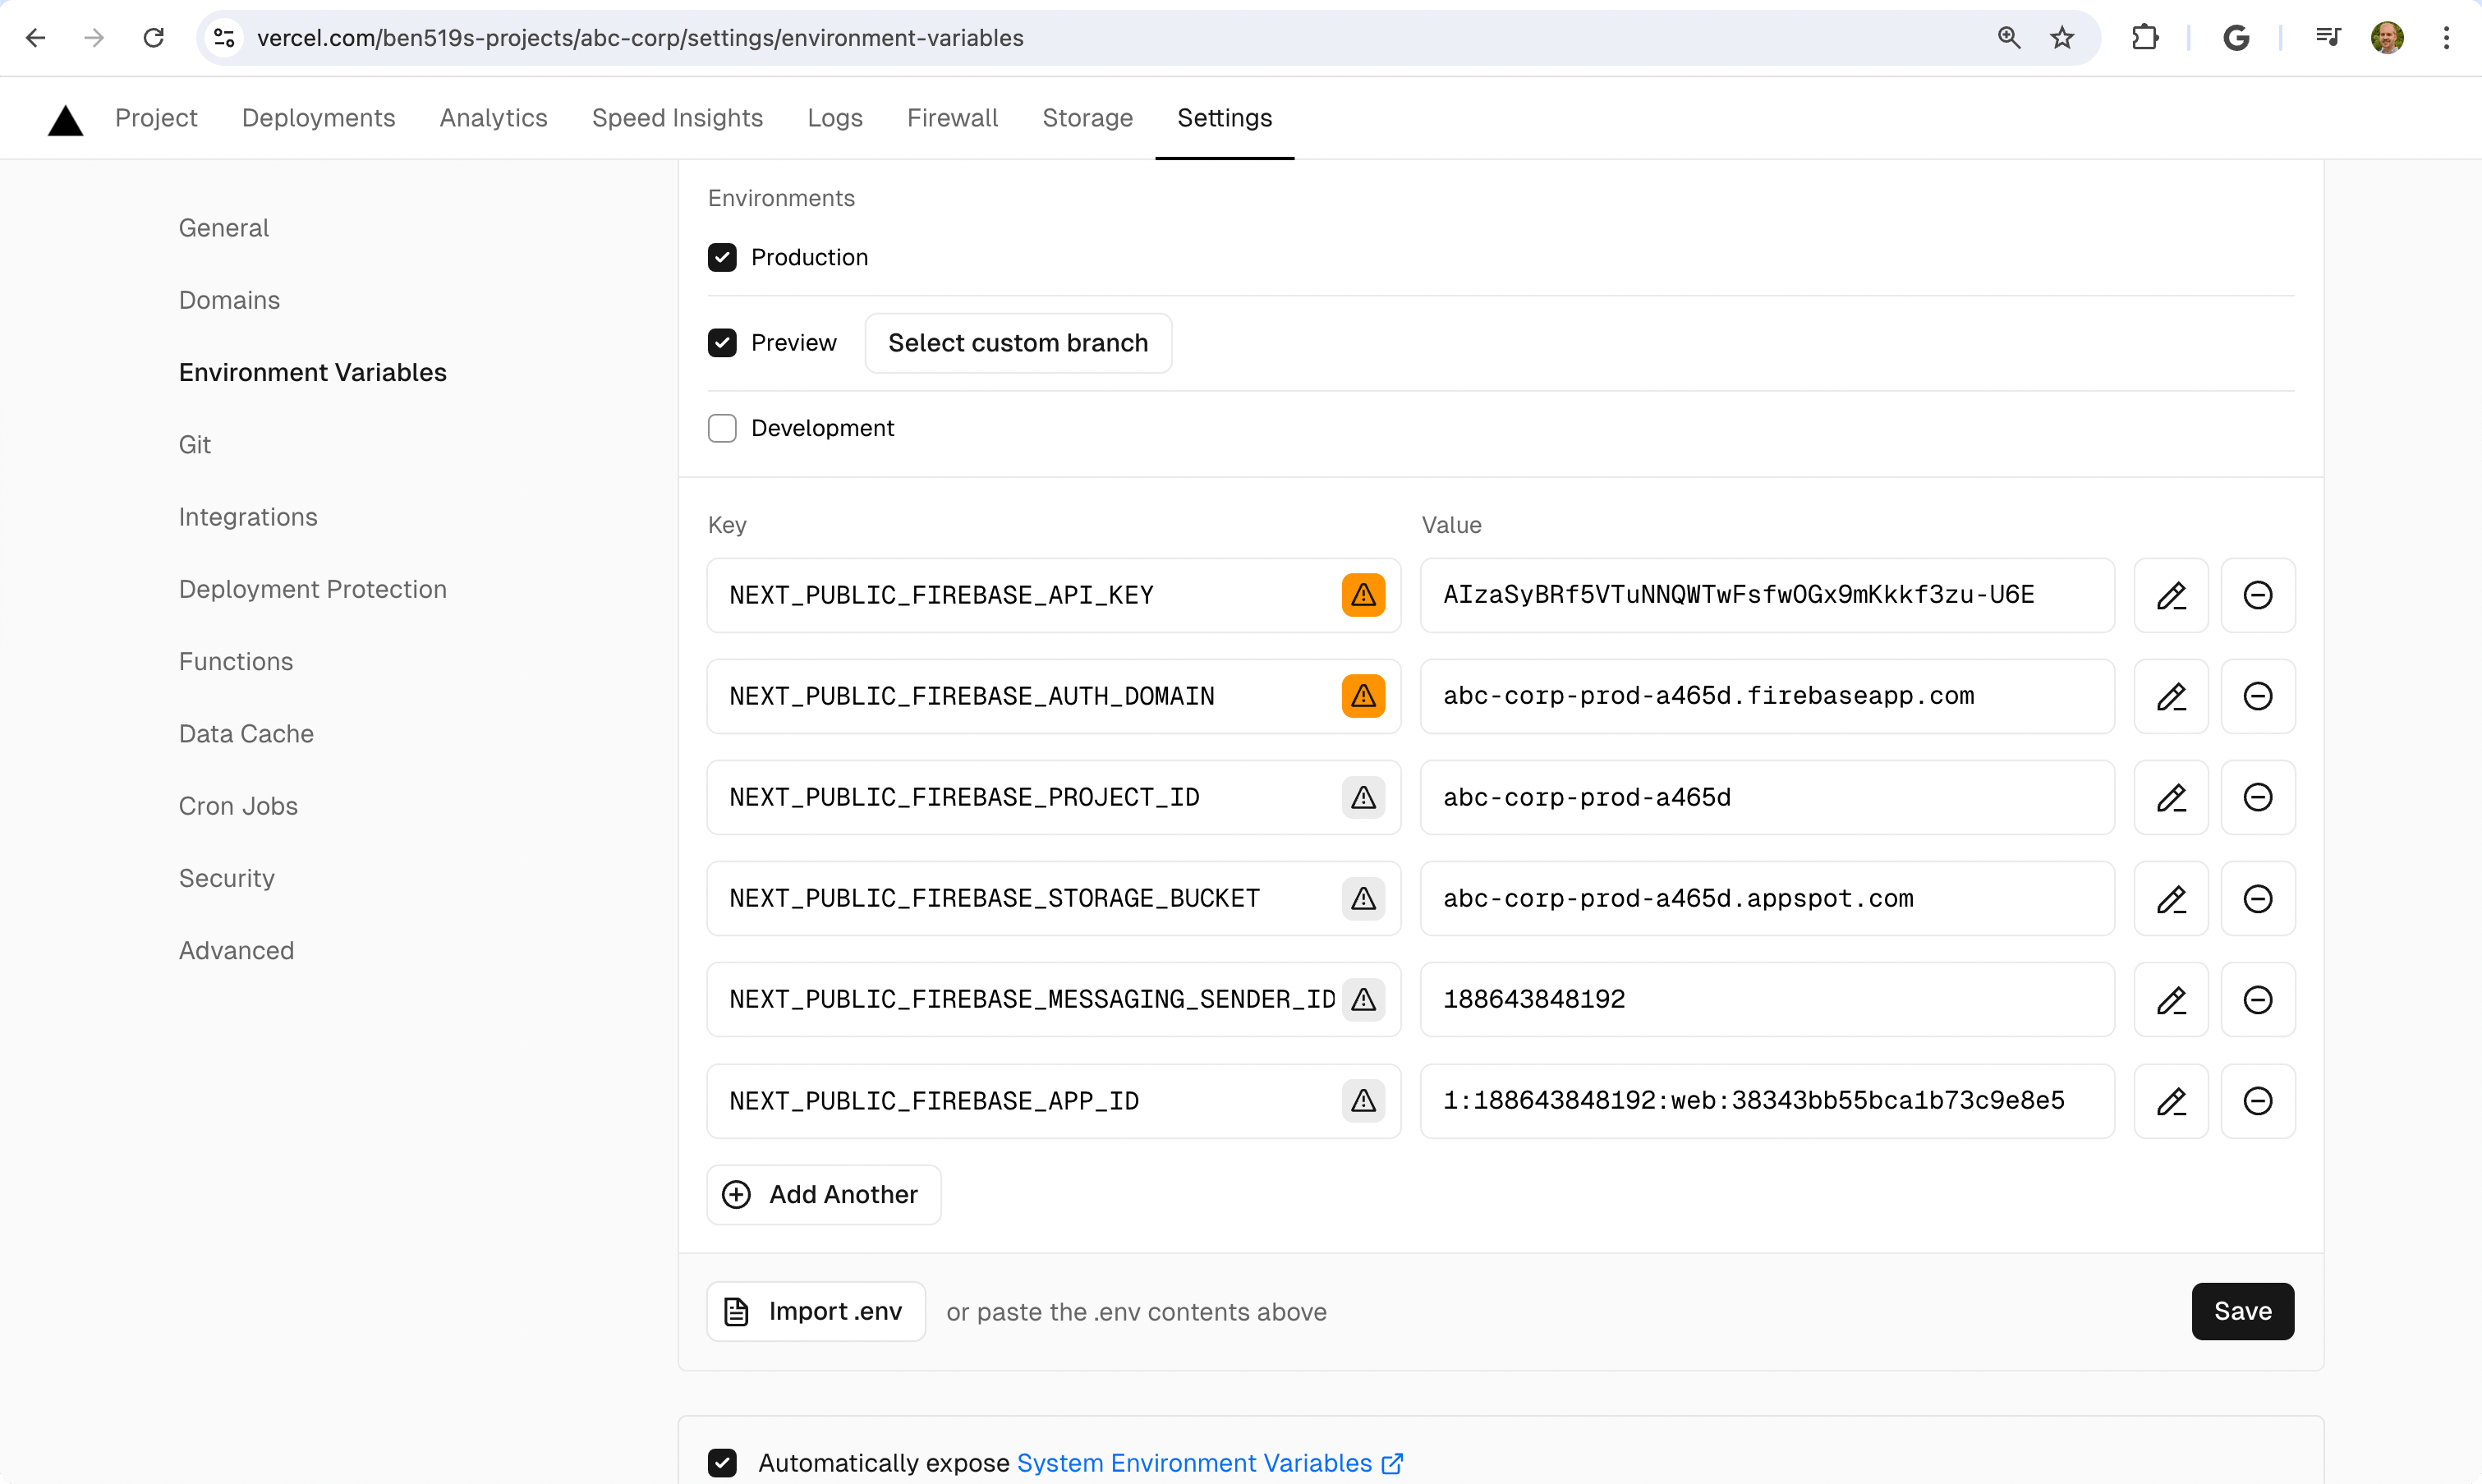
firebase.jswith environment variables.import { initializeApp } from "firebase/app" const firebaseConfig = { apiKey: process.env.NEXT_PUBLIC_FIREBASE_API_KEY, authDomain: process.env.NEXT_PUBLIC_FIREBASE_AUTH_DOMAIN, projectId: process.env.NEXT_PUBLIC_FIREBASE_PROJECT_ID, storageBucket: process.env.NEXT_PUBLIC_FIREBASE_STORAGE_BUCKET, messagingSenderId: process.env.NEXT_PUBLIC_FIREBASE_MESSAGING_SENDER_ID, appId: process.env.NEXT_PUBLIC_FIREBASE_APP_ID, } // Initialize Firebase const app = initializeApp(firebaseConfig)# Development settings and API keys go here # This file should not be tracked by git ### Firebase keys NEXT_PUBLIC_FIREBASE_API_KEY=AIzaSyCUHzJa3Hnm6thqk5ZQG9ZP-vUWBqkPU5I NEXT_PUBLIC_FIREBASE_AUTH_DOMAIN=abc-corp-dev-73614.firebaseapp.com NEXT_PUBLIC_FIREBASE_PROJECT_ID=abc-corp-dev-73614 NEXT_PUBLIC_FIREBASE_STORAGE_BUCKET=abc-corp-dev-73614.appspot.com NEXT_PUBLIC_FIREBASE_MESSAGING_SENDER_ID=156895892077 NEXT_PUBLIC_FIREBASE_APP_ID=1:156895892077:web:7263700fbccb184fa02564# Production settings and API keys go here # This file should not be tracked by git ### Firebase keys NEXT_PUBLIC_FIREBASE_API_KEY=AIzaSyBRf5VTuNNQWTwFsfw0Gx9mKkkf3zu-U6E NEXT_PUBLIC_FIREBASE_AUTH_DOMAIN=abc-corp-prod-a465d.firebaseapp.com NEXT_PUBLIC_FIREBASE_PROJECT_ID=abc-corp-prod-a465d NEXT_PUBLIC_FIREBASE_STORAGE_BUCKET=abc-corp-prod-a465d.appspot.com NEXT_PUBLIC_FIREBASE_MESSAGING_SENDER_ID=188643848192 NEXT_PUBLIC_FIREBASE_APP_ID=1:188643848192:web:38343bb55bca1b73c9e8e5Copy these environment variables to Vercel!
Don't forget to add these environment variables to your Vercel project, under Settings > Environment Variables.
4. Enable Firebase services via the console
Enable the Firebase services that you want to use from the Firebase Console. You should enable the same set of services for your dev and prod projects.
For my abc-corp application, I'm going to enable Authentication, Firestore, Functions, and Storage.
Initialize Firebase services via firebase init
After enabling services in the Firebase console, we can initialize the same services in the Next.js application using the firebase CLI command firebase init.
$ firebase init
The init command prompts you to make a number of selections. Here's what I chose 👇
Which Firebase features do you want to set up for this directory?
Firestore
Cloud Functions
Storage

=== Project Setup

Use an existing project
abc-corp-dev-73614 (abc-corp-dev)

=== Firestore Setup

What file should be used for Firestore Rules?
firestore.rules

What file should be used for Firestore indexes?
firestore.indexes.json

=== Functions Setup

What language would you like to use to write Cloud Functions?
JavaScript

Do you want to use ESLint to catch probable bugs and enforce style?
Yes

=== Storage Setup

What file should be used for Storage Rules?
storage.rules
Should I choose the dev or prod project?
Either. Later on we're going to add the other project to our config.
Setting up dev and prod environments
After the init command does it's thing, my project looks like this
abc-corp-app
├── .env.development
├── .env.production
├── .eslintrc.json
├── .firebaserc
├── .git
│   └── ...
├── .gitignore
├── .vscode
│   ├── settings.json
│   └── tasks.json
├── README.md
├── firebase.json
├── firestore.indexes.json
├── firestore.rules
├── functions
│   ├── .eslintrc.js
│   ├── .gitignore
│   ├── index.js
│   ├── package-lock.json
│   └── package.json
├── jsconfig.json
├── next.config.mjs
├── package-lock.json
├── package.json
├── postcss.config.mjs
├── public
│   ├── next.svg
│   └── vercel.svg
├── src
│   └── app
│       ├── favicon.ico
│       ├── firebase.js
│       ├── globals.css
│       ├── layout.js
│       └── page.js
├── storage.rules
└── tailwind.config.js
Let's inspect the file .firebaserc.
{
  "projects": {
    "default": "abc-corp-dev-73614"
  }
}
This file specifies project aliases, but at the moment it only includes my dev project. I need to add my prod project. I'll modify .firebaserc accordingly.
{
  "projects": {
    "dev": "abc-corp-dev-73614",
    "prod": "abc-corp-prod-a465d"
  },
}What is this for?
Eventually we're going to deploy changes in our local environment to Firebase. When we deploy a change, we need tell Firebase which project to update (dev or prod).
Which project is currently active?
To see which project is currently active, run firebase use.
$ firebase use
> Active Project: dev (abc-corp-dev-73614)
>
> Project aliases for /Users/bgorman/Projects/ABC Corp/abc-corp-app:
>
>   prod (abc-corp-prod-a465d)
> * dev (abc-corp-dev-73614)
>
> Run firebase use --add to define a new project alias.How do I change the currently active project?
To change the currently active project, run firebase use <alias>.
$ firebase use prod
> Now using alias prod (abc-corp-prod-a465d)Test deployment
Now's a good time to test our updated firebase configuration. Let's make a small change to our Firestore rules.
Our Firestore rules live in three places:
- In Firebase, in the dev project
- In Firebase, in the prod project
- In our local project, in the file
firestore.rules
-
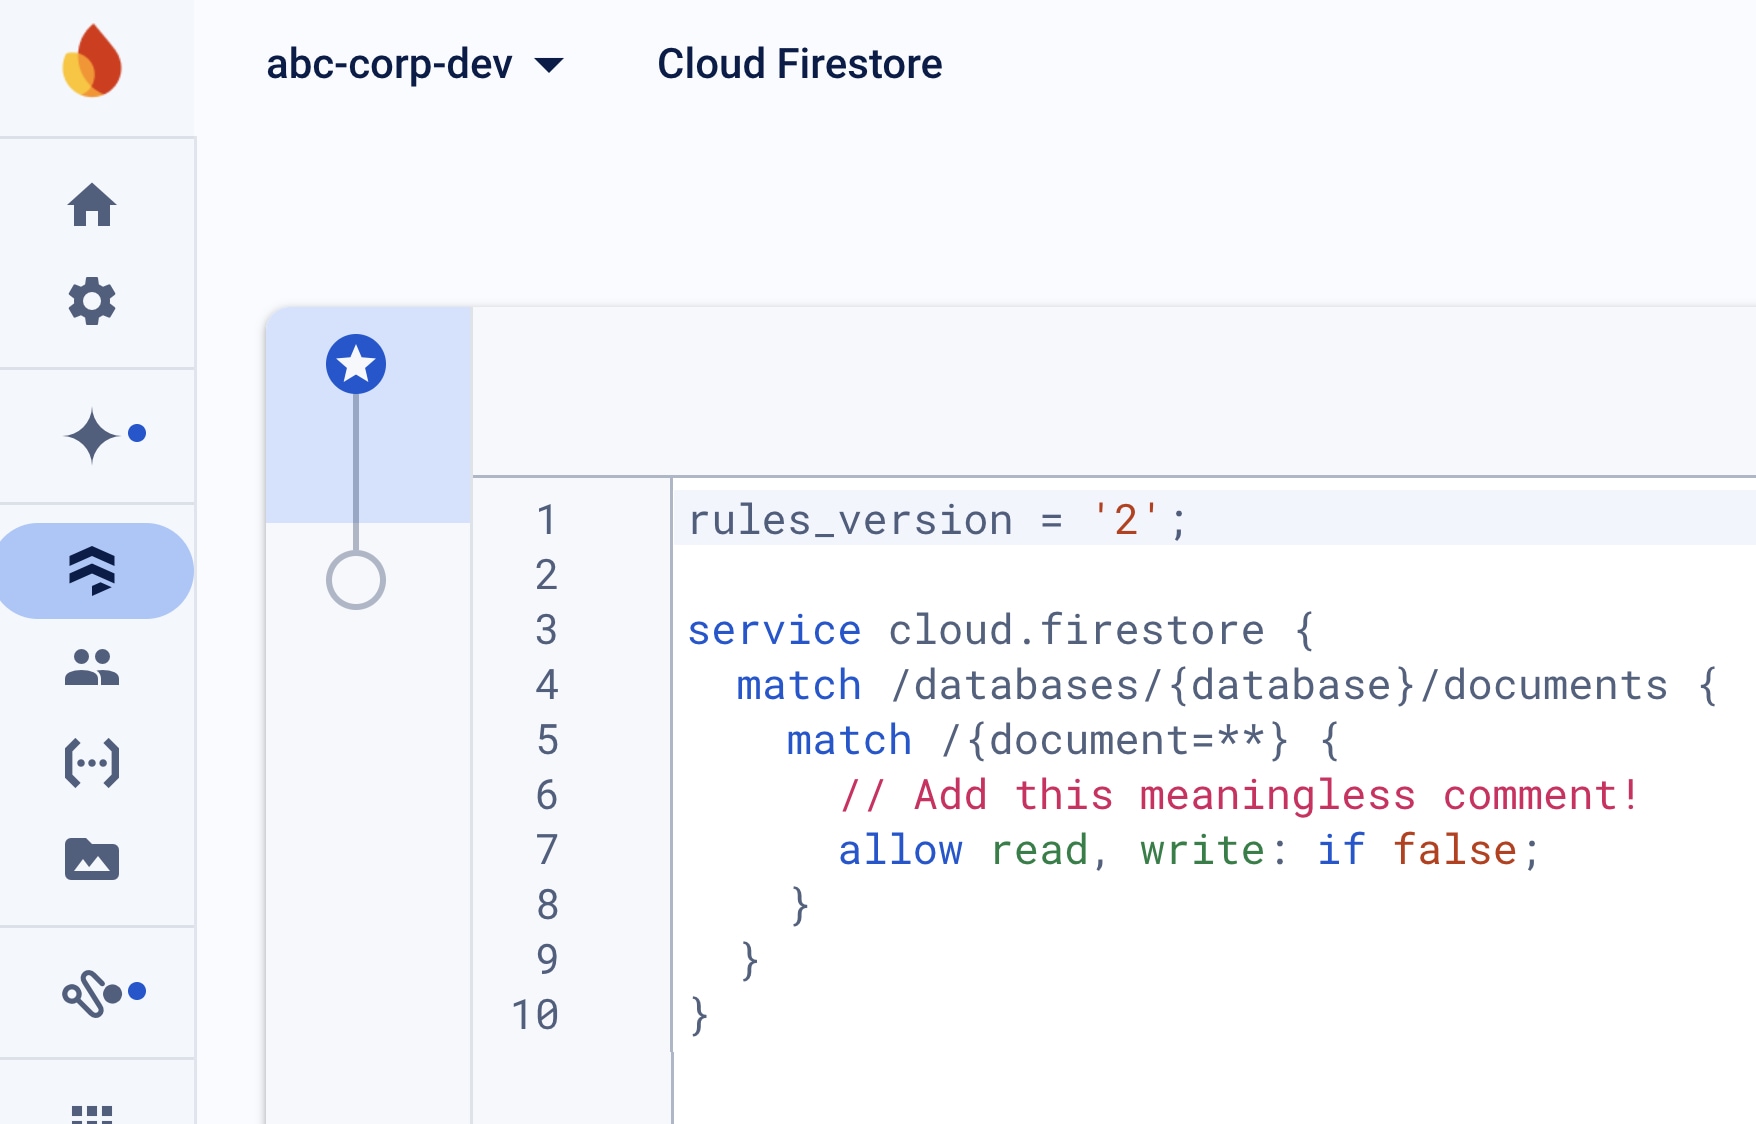
Modify the local file,
firestore.rules, like thisfirestore.rules rules_version = '2'; service cloud.firestore { match /databases/{database}/documents { match /{document=**} { // Add this meaningless comment! allow read, write: if false; } } }At this point, our prod and dev rules are out of sync with our local
firestore.rules. We need to deploy our changes. -
Switch to the dev project. In other words, make the dev project the active project.
$ firebase use devRun this from the working directory: abc-corp-app/ -
Deploy the firestore rules.
$ firebase deploy --only firestore:rules

> === Deploying to 'abc-corp-dev-73614'...
>
> i  deploying firestore
> i  firestore: reading indexes from firestore.indexes.json...
> i  cloud.firestore: checking firestore.rules for compilation errors...
> ✔  cloud.firestore: rules file firestore.rules compiled successfully
> i  firestore: uploading rules firestore.rules...
> ✔  firestore: released rules firestore.rules to cloud.firestore
>
> ✔  Deploy complete!
>
> Project Console: https://console.firebase.google.com/project/abc-corp-dev-73614/overview
Run this from the working directory: abc-corp-app/ Now the firestore rules in the dev project are in sync with our local rules. But our prod project is still out-of-sync.
-
Switch to the prod project and deploy the rules again.
$ firebase use prod
$ firebase deploy --only firestore:rules
Run this from the working directory: abc-corp-app/
Tip
You can inspect the Firestore rules in the Firebase Console to see that your changes were properly deployed.
5. Initialize the Firebase Emulator
The Firebase Emulator Suite lets you to test and develop Firebase services locally. I cannot recommend it enough.
How do I set up the Emulator?
-
Run
firebase init.$ firebase initRun this from the working directory: abc-corp-app/ -
Choose Emulators in the subsequent prompt.
Which Firebase features do you want to set up for this directory? ◯ Storage: Configure a security rules file for Cloud Storage ❯◉ Emulators: Set up local emulators for Firebase products -
Answer the subsequent prompts. Here are my selections 👇
=== Emulators Setup Which Firebase emulators do you want to set up? ◉ Authentication Emulator ◉ Functions Emulator ◉ Firestore Emulator ◯ Database Emulator ◯ Hosting Emulator ◯ Pub/Sub Emulator ◉ Storage Emulator Which port do you want to use for the auth emulator? 9099 Which port do you want to use for the functions emulator? 5001 Which port do you want to use for the firestore emulator? 8080 Which port do you want to use for the storage emulator? 9199 Would you like to enable the Emulator UI? Yes Which port do you want to use for the Emulator UI (leave empty to use any available port)? Would you like to download the emulators now? Yes -
Add the following environment variables to
.env.development.env.development ### Firebase Emulator FIRESTORE_EMULATOR_HOST="127.0.0.1:8080" FIREBASE_AUTH_EMULATOR_HOST="127.0.0.1:9099" FIREBASE_STORAGE_EMULATOR_HOST="127.0.0.1:9199" -
Start the emulator.
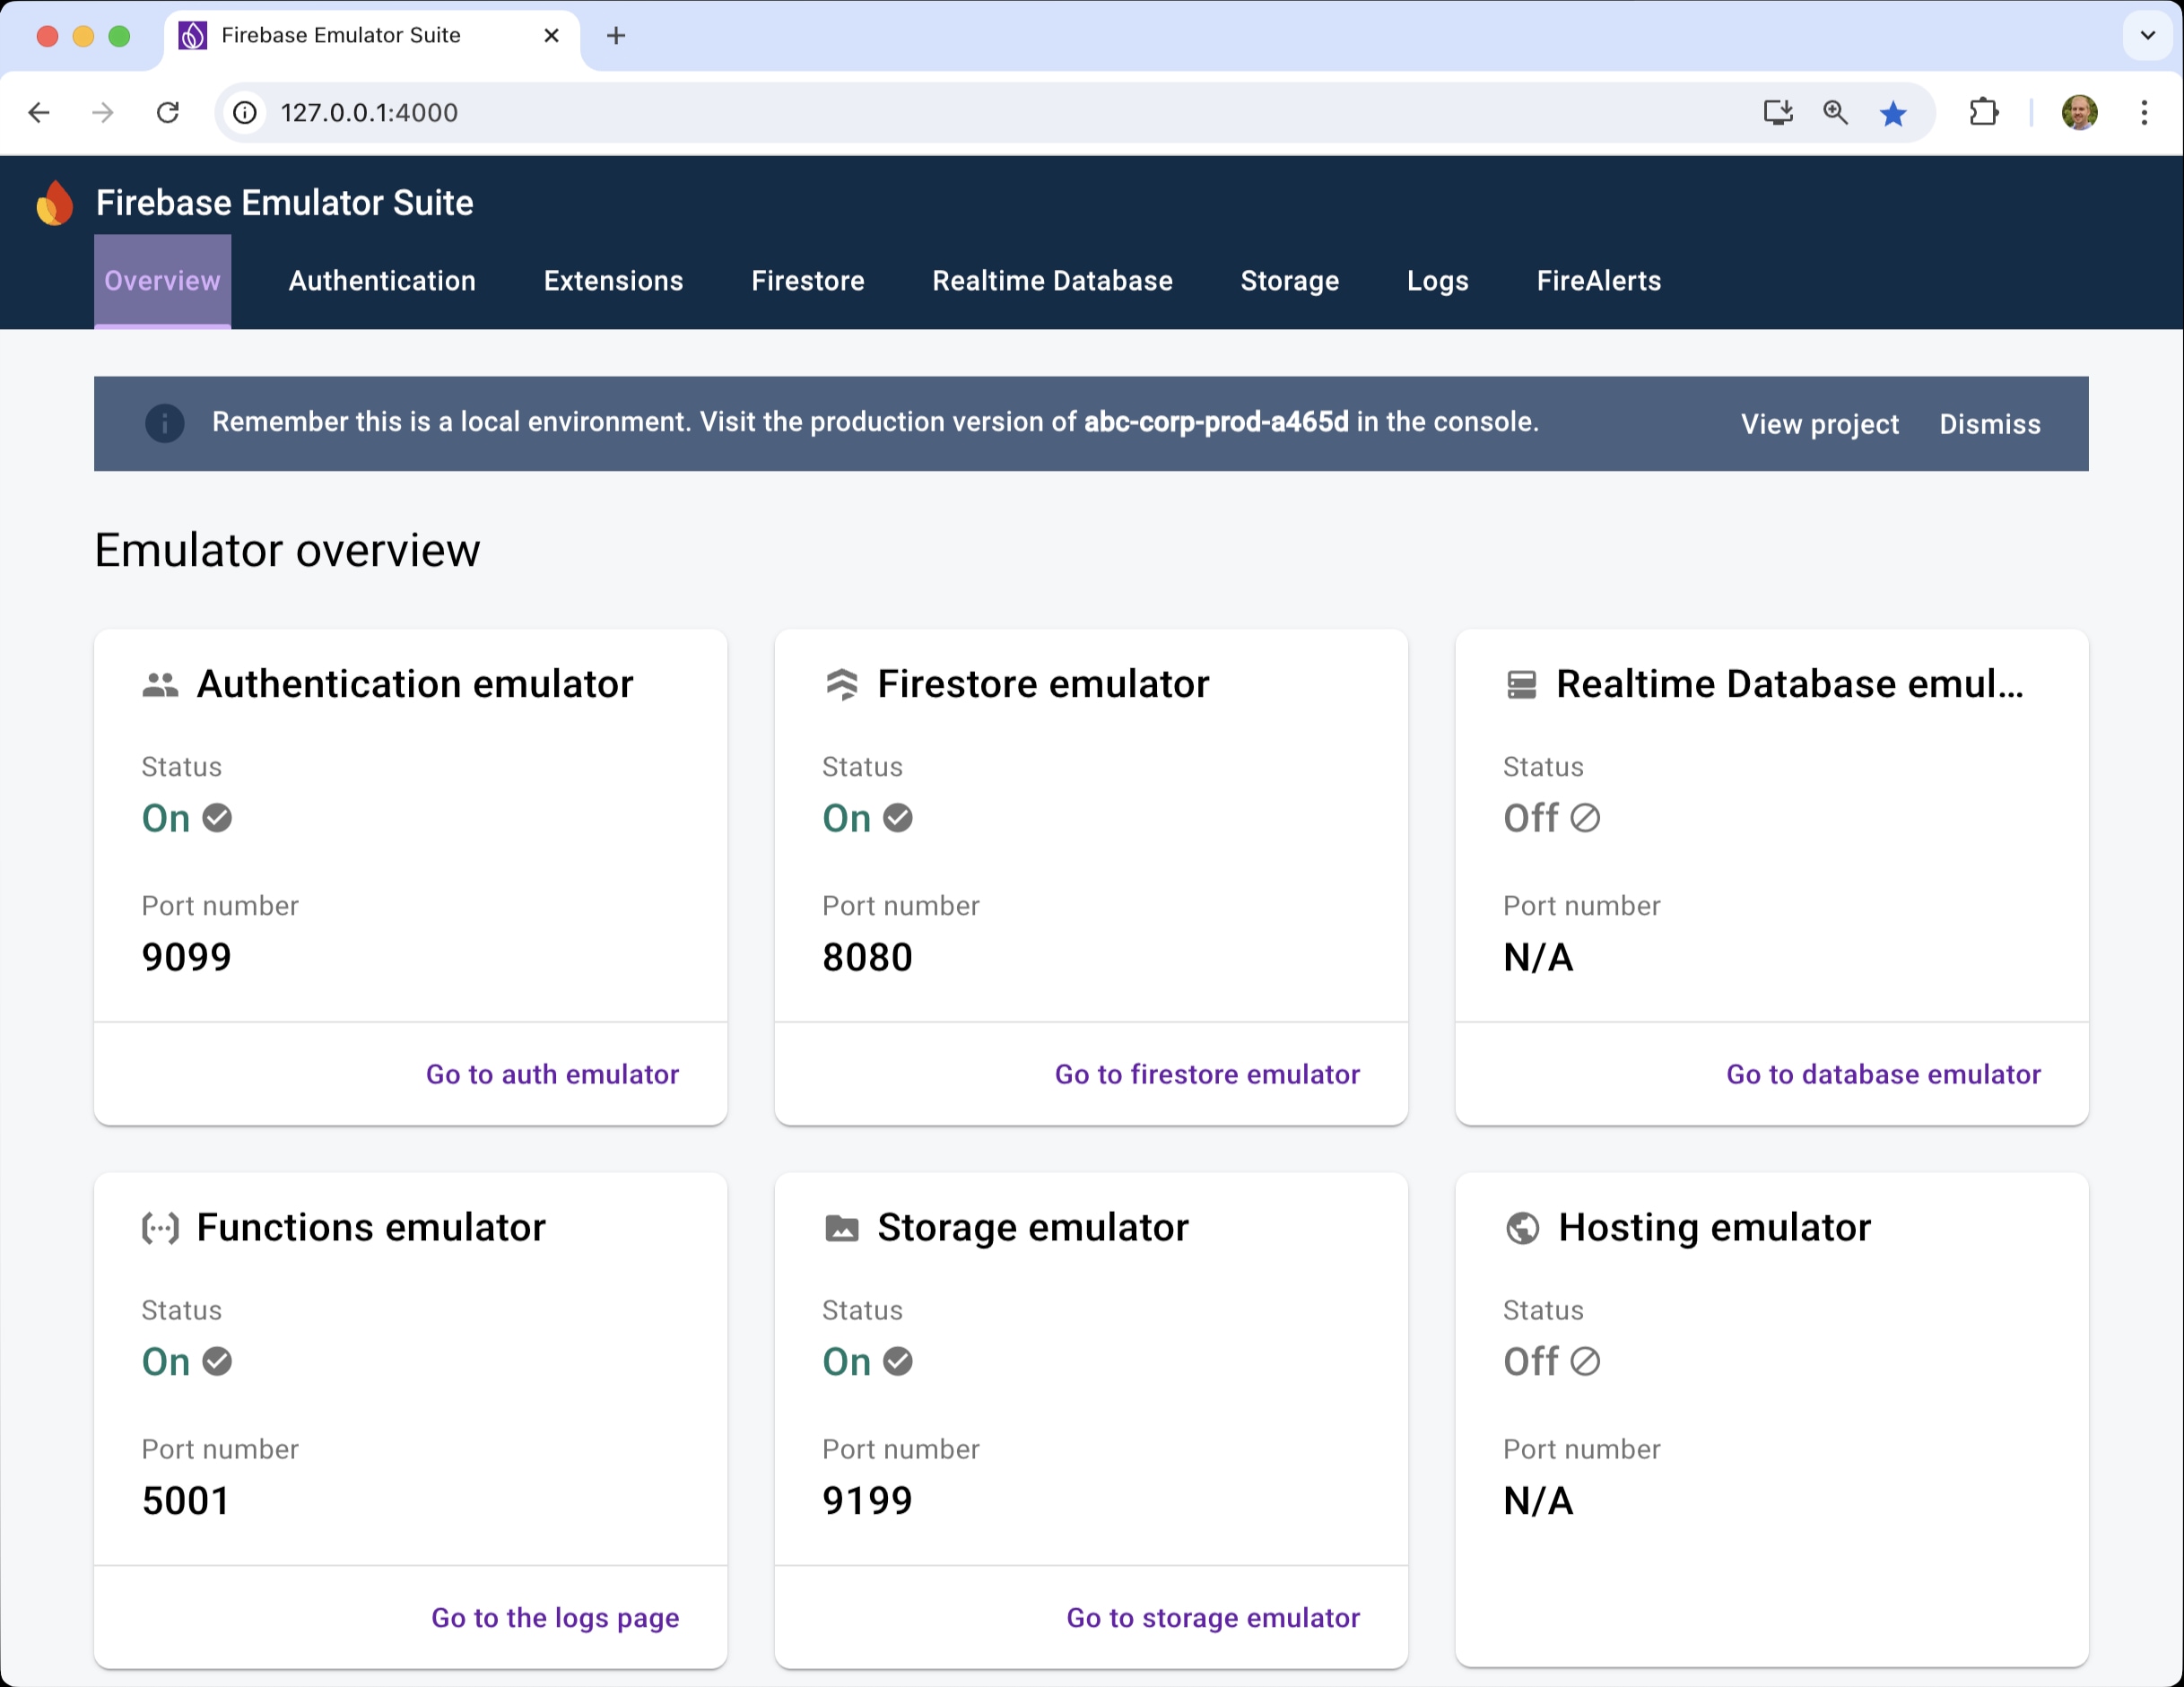
$ firebase emulators:start > i emulators: Starting emulators: auth, functions, firestore, storage > ⚠ functions: The following emulators are not running, calls to these services from the Functions emulator will affect production: database, hosting, pubsub, dataconnect > i firestore: Firestore Emulator logging to firestore-debug.log > ✔ firestore: Firestore Emulator UI websocket is running on 9150. > i ui: Emulator UI logging to ui-debug.log > i functions: Watching "/Users/spngebob/Projects/ABC Corp/abc-corp-app/functions" for Cloud Functions... > ⚠ functions: Your requested "node" version "18" doesn't match your global version "20". Using node@20 from host. > Serving at port 8071 > > ✔ functions: Loaded functions definitions from source: . > > ┌─────────────────────────────────────────────────────────────┐ > │ ✔ All emulators ready! It is now safe to connect your app. │ > │ i View Emulator UI at http://127.0.0.1:4000/ │ > └─────────────────────────────────────────────────────────────┘ > > ┌────────────────┬────────────────┬─────────────────────────────────┐ > │ Emulator │ Host:Port │ View in Emulator UI │ > ├────────────────┼────────────────┼─────────────────────────────────┤ > │ Authentication │ 127.0.0.1:9099 │ http://127.0.0.1:4000/auth │ > ├────────────────┼────────────────┼─────────────────────────────────┤ > │ Functions │ 127.0.0.1:5001 │ http://127.0.0.1:4000/functions │ > ├────────────────┼────────────────┼─────────────────────────────────┤ > │ Firestore │ 127.0.0.1:8080 │ http://127.0.0.1:4000/firestore │ > ├────────────────┼────────────────┼─────────────────────────────────┤ > │ Storage │ 127.0.0.1:9199 │ http://127.0.0.1:4000/storage │ > └────────────────┴────────────────┴─────────────────────────────────┘ > Emulator Hub running at 127.0.0.1:4400 > Other reserved ports: 4500, 9150 -
Click the Emulator UI link to open the Emulator in your browser.
Verbose console logging
I prefer to launch the emulator using the --debug flag, as it logs more information to the console. This is particularly helpful when debugging.
$ firebase emulators:start --debugFurthermore, I recommend setting this up as a task, and then creating a Task Button for it.
{
  "version": "2.0.0",
  "tasks": [
    {
      "label": "Firebase emulators: debug",
      "type": "shell",
      "command": "firebase emulators:start --debug",
      "presentation": {
        "panel": "dedicated"
      }
    },
    {
      "label": "Next.js: run",
      "type": "npm",
      "script": "dev",
      "presentation": {
        "panel": "dedicated"
      }
    },
  ]
}
{
"VsCodeTaskButtons.showCounter": false,
"VsCodeTaskButtons.tasks": [
{
"label": "🔺 Next",
"task": "Next.js: run"
},
{
"label": "🔥 Firebase",
"task": "Firebase emulators: debug"
},
]
}6. Instantiate Firebase Services using the Web SDK
Update the file src/app/firebase.js to instantiate and export an instance for each firebase service that you want to use client-side.
// Import the functions you need from the SDKs you need
import { initializeApp } from "firebase/app"
import { connectAuthEmulator, getAuth } from "firebase/auth"
import { connectFirestoreEmulator, getFirestore } from "firebase/firestore"
import { connectFunctionsEmulator, getFunctions } from "firebase/functions"
import { connectStorageEmulator, getStorage } from "firebase/storage"

// Your web app's Firebase configuration
const firebaseConfig = {
  apiKey: process.env.NEXT_PUBLIC_FIREBASE_API_KEY,
  authDomain: process.env.NEXT_PUBLIC_FIREBASE_AUTH_DOMAIN,
  projectId: process.env.NEXT_PUBLIC_FIREBASE_PROJECT_ID,
  storageBucket: process.env.NEXT_PUBLIC_FIREBASE_STORAGE_BUCKET,
  messagingSenderId: process.env.NEXT_PUBLIC_FIREBASE_MESSAGING_SENDER_ID,
  appId: process.env.NEXT_PUBLIC_FIREBASE_APP_ID,
}

// Initialize Firebase
const app = initializeApp(firebaseConfig)

// Instantiate services
export const auth = getAuth(app)
export const db = getFirestore(app)
export const functions = getFunctions(app)
export const storage = getStorage(app)

// Emulator
if (process.env.NODE_ENV == "development") {
  connectAuthEmulator(auth, "http://127.0.0.1:9099")
  connectFunctionsEmulator(functions, "127.0.0.1", 5001)
  connectFirestoreEmulator(db, "127.0.0.1", 8080)
  connectStorageEmulator(storage, "127.0.0.1", 9199)
}
Now you can use these objects to write client-side code. For example, if you want to create a password based account, you can follow the Firebase docs here, where they suggest doing
import { getAuth, createUserWithEmailAndPassword } from "firebase/auth";

const auth = getAuth();
createUserWithEmailAndPassword(auth, email, password)
  .then((userCredential) => {
    // Signed up
    const user = userCredential.user;
    // ...
  })
  .catch((error) => {
    const errorCode = error.code;
    const errorMessage = error.message;
    // ..
  });
BUT, instead of re-instantiating the auth object, you can just import it from firebase.js.
import { auth } from "@/app/firebase";
import { createUserWithEmailAndPassword } from "firebase/auth";

createUserWithEmailAndPassword(auth, email, password)
  .then((userCredential) => {
    // Signed up
    const user = userCredential.user;
    // ...
  })
  .catch((error) => {
    const errorCode = error.code;
    const errorMessage = error.message;
    // ..
  });
7. Instantiate Firebase Services using the Admin SDK
If you're using Next.js, you may want to do some things server-side as opposed to client-side. For example, you may want to fetch data from Firestore or Storage inside a page.jsx file. In such cases, you'll want to use the Firebase Admin SDK - not the Web SDK.
To do this, we're going to create a file called src/app/firebaseAdmin.js, very similar to src/app/firebase.js.
-
Create and download a service account key from the Firebase Console.
Project Settings > Service accounts > Generate new private key
Do this for both the dev and prod projects.
-
Create the following environment variables inside
.env.development.env.development # Development settings and API keys go here # This file should not be tracked by git ### Firebase keys NEXT_PUBLIC_FIREBASE_API_KEY=AIzaSyCUHG9ZP-vUWBqkPU5I NEXT_PUBLIC_FIREBASE_AUTH_DOMAIN=abc-corp-dev-73614.firebaseapp.com NEXT_PUBLIC_FIREBASE_PROJECT_ID=abc-corp-dev-73614 NEXT_PUBLIC_FIREBASE_STORAGE_BUCKET=abc-corp-dev-73614.appspot.com NEXT_PUBLIC_FIREBASE_MESSAGING_SENDER_ID=156895892077 NEXT_PUBLIC_FIREBASE_APP_ID=1:1569892077:web:7263700fbcb18fa02564 ### Firebase private data FIREBASE_CLIENT_EMAIL=firebase-adminsdk-nuw3j@abc-corp-dev-73614.iam.gserviceaccount.com FIREBASE_PRIVATE_KEY='"-----BEGIN PRIVATE KEY-----\nMIIEvgIBADANBgkqhkiG9w0BAQEFAASCBKgwggSkAgEAAoIBAQDf7+nbNAQPIa7D\nBWoL0yYllr4lZviQK5j8ReM8UH61MV393YsLasSCcJN25K4995AIjt0eTmHrJk1A\n6YuBNQhidL2icRK2ors84z1pzfCO5DKZxKrK4f450SFcsHSxkNh0Zvmn1zqke\ndRdW5/Zee1FS8cp5gIEXga1C+R0/O0q/CFsuTtPv7BB/WkyBcgpZfdch77U5Fy0x\nFPK3HvlSFwRbMtLZtVlQZ2XIJqlZcmC07ypXJv1OkssbRwI48WWqkAy8fNuEMa\nibaLh5Ry/ODo0OIuqSvnYzgKArs+w8OPi5U9gYjY90+beskWwJpwH4dmDACMqO\nJdnzKBv1AgMBAAECggEAUCO+F43CZB3kOnOuE0RBsxMCwkTa8FFwopu5R8++AK\naIcHsxLG931N++8XsuhvmFhUp8vVgMLo5Ft/wgH4fys3buwQB0rGIQQNSL4b8l\noqTgkFGXFt7SJvqLaC+6irRY7rUXm3mVSUqTCy1hHEfafyn7kUbdK+ni9QRMpKsq\nmcX+6iaX16xmZC5KW7pPP/fy/73fxvCJ2lHG5U53//BDZ3KyXnw4nTNJBaKIjB\nIb1lY0HHb6QTBM21bjLmWNTpUCEtCNWWD6oHeMcDv2Q3BlVhCPhO8mqAAfD5f2\nl9NwFeH7qpj8HI/89GzCuSep/JbkSgXESce1ipmXAwKBgQDxpjbslFOMhzBk5hVr\nwbY6oE4tB2ID6Y0FimSNI/EscNC5njcSM2QLhYdsmWPa+ocxFezhZdKxecPv7qpd\nyUn08bNn67i83eeI23y+pdidAcCaT+wewy8QEbYsXpTB4D33Zxyn8Ypg3FiRY4pu\nrjL3fWukpVr3iYxgpW7sOMxtYwKBgQDtPGwczWn4ynl9C/A+XUK5yu1krlGENZis\nAixIMLlrKzcgBO0AfdUOk99FqrJ4FlVeD1p9SPGjDj5obIdmFYBp4QLLCKiQISwx\nVYH6XFZjqu8FDF4SGN3GTv3DOqq7pC7r13a91UhuVqGO8JWTVSiw1VwPPWixKVJW\nbin85CrcxwKBgQCbnnwOfTMU89bBk77Fx1kwhh3yN6fydwx/PfGlRzlAcmKotvAm\nQ3wxQ0vEL0A0PFSl0sXbHfTCoHUDZgLHJSMAoEr2KMKutoUuCJNcP3exHPjJJ6Ea\n6n27bnyQNFS+Skf9tKSqrw17dUuATcdPodVmtpmEzYw4j5ccgk1dyPI1mwKBgQDE\ngyuPBDzHAHl4Mr5z+m6+VjElGBygJoFr4nTp66p78pU8hkktc8txLYs5gYT2+x\ndYhghV7b0X2ypYLPFtQx08L9TpZwEjcJA12Rq9NIXEFEPmLe1SnxYRRyUIMp\nixZqE1VnSM2VCQbtvznwmRwj55tkPTVeMO0I9bvnmwKBgFK3m9EgCj0aK2HLJF3J\nTNtVnbzt/PU3g0JaM6BN1LaNZhj8tPRoX31RR7wpmzOrZ4vK0Q97mboJwocnW2IH\nZXarYEJ/LHwDNgLevcMetDQMaBvU/w56HwhuXu3rI6RYD7vdS9aq+R6PKRM+bi\nEHYLGE48LbjaaQSuPQgOF4\n-----END PRIVATE KEY-----\n"'Notes
- The values for
FIREBASE_CLIENT_EMAILandFIREBASE_PRIVATE_KEYcan be obtained from inside the.jsonkey file you downloaded in Step 1. - Locally, you need to wrap
FIREBASE_PRIVATE_KEYin single quotes'since its value starts and ends with double quotes". Exclude the single quotes when you add the value to Vercel.
DANGER
Do not preface these environment variables with
NEXT_PUBLIC_! These variables should remain hidden from the client (i.e. they should only be available server-side).Repeat this process for the prod environment and
.env.productionfile. - The values for
-
Create a new file called
src/app/firebaseAdmin.jswith the following contents.src/app/firebaseAdmin.js import { cert, getApp, getApps, initializeApp } from "firebase-admin/app" import { getAuth } from "firebase-admin/auth" import { getFirestore } from "firebase-admin/firestore" const adminApp = getApps().length > 0 ? getApp() : process.env.NODE_ENV == "development" ? initializeApp({ projectId: process.env.NEXT_PUBLIC_FIREBASE_PROJECT_ID }) : initializeApp({ credential: cert({ projectId: process.env.NEXT_PUBLIC_FIREBASE_PROJECT_ID, clientEmail: process.env.FIREBASE_CLIENT_EMAIL, privateKey: JSON.parse(process.env.FIREBASE_PRIVATE_KEY), }), }) export const adminAuth = getAuth(adminApp) export const adminDB = getFirestore(adminApp)This file instantiates and exports an
adminAuthinstance and anadminDBinstance.
Now you can import these objects into a page.jsx file to implement server-side logic. For example, maybe you want to fetch data from Firestore before rendering a certain page..
import { adminDB } from "@/app/firebaseAdmin"

export default async function Page({ params }) {
  // Get the requested postId from the route params
  const { postId } = params

  // Fetch the requested post
  const postRef = adminDB.collection('posts').doc(postId);
  const postDoc = await postRef.get();
  const post = postDoc.data();

  // Render the page
  return <div>{ post.title }</div>
}
8. Configure Firebase Functions
Firebase functions live in the functions/ directory.
abc-corp-app
├── functions
│   ├── .eslintrc.js
│   ├── .gitignore
│   ├── index.js
│   ├── package-lock.json
│   └── package.json
...
Initially, you can define functions inside index.js, but this can become unwieldy as your project grows. My preference is to create a single .js for each function inside the functions/ directory. Then I import and export each function from index.js.
For example, I might add a createPost() function as follows
abc-corp-app
├── functions
│   ├── .eslintrc.js
│   ├── .gitignore
│   ├── createPost.js     <-- add this file
│   ├── index.js
│   ├── package-lock.json
│   └── package.json
...
import { onCall } from "firebase-functions/v2/https"
export const createPost = onCall((request) => {
// Create a post
console.log("Creating a new post...")
// ...
})import { createPost as _createPost } from "./createPost.js"
export const createPost = _createPost{
"name": "functions",
"description": "Cloud Functions for Firebase",
"type": "module", <-- add this!
"scripts": {
"lint": "eslint .",
"serve": "firebase emulators:start --only functions",
"shell": "firebase functions:shell",
"start": "npm run shell",
"deploy": "firebase deploy --only functions",
"logs": "firebase functions:log"
},
"engines": {
"node": "18"
},
"main": "index.js",
"dependencies": {
"firebase-admin": "^12.1.0",
"firebase-functions": "^5.0.0"
},
"devDependencies": {
"eslint": "^8.15.0",
"eslint-config-google": "^0.14.0",
"firebase-functions-test": "^3.1.0"
},
"private": true
}"type": "module" to package.json to enable ES 6 modules (import as opposed to require statements).Deploying Firebase Functions
You can deploy your locally-defined firebase functions using the firebase CLI.
How do I deploy all my functions?
$ firebase use dev
$ firebase deploy --only functions
$ firebase use prod
$ firebase deploy --only functionsHow do I deploy a specific function?
$ firebase use dev
$ firebase deploy --only functions:createPost
$ firebase use prod
$ firebase deploy --only functions:createPostHow do I deploy two or more specific functions?
Delineate the function names with spaces.
$ firebase use dev
$ firebase deploy --only functions:createPost editPost deletePost
$ firebase use prod
$ firebase deploy --only functions:createPost editPost deletePostHow do I delete a firebase function?
$ firebase use dev
$ firebase functions:delete createPost
$ firebase use prod
$ firebase functions:delete createPostThis doesn't delete your function code. It just deletes the function from Firebase. You can also delete a function manually, from the Firebase Console.
Tip
Use the --debug flag if something goes wrong. For instance,
firebase deploy --only functions --debugCross-Origin Resource Sharing (CORS)
Inevitably, you'll need to deal with CORS at some point.
-
Create a file
functions/main.jswith the following contents.abc-corp-app ├── functions │ ├── .eslintrc.js │ ├── .gitignore │ ├── createPost.js │ ├── index.js │ ├── main.js <-- add this file │ ├── package-lock.json │ └── package.json ...import { initializeApp } from "firebase-admin/app" // Initialize app initializeApp() setGlobalOptions({ region: "your-region" }) // CORS export const cors = [ "http://localhost:3000", "https://www.yourdomain.com", ]You'll need to modify this to suit your specific region and domain name.
-
Update your functions to use the
corsarray exported frommain.js.functions/createPost.js import { onCall } from "firebase-functions/v2/https" import { cors } from "./main.js" export const createPost = onCall({ cors }, (request) => { // Create a post console.log("Creating a new post...") // ... })
Environment Variables
Firebase functions support the use of environment variables.
-
Create a file
functions/.env.dev -
Create a file
functions/.env.prod -
Define any env vars you want to use, in these files. For example,
SITE_URL=https://staging.mydomain.com/SITE_URL=https://www.mydomain.com/
Now you can reference these env vars inside your Firebase functions using process.env.VARNAME.
Furthermore, when you deploy your functions to dev/prod, the corresponding environment variables will be used in the deployment.
Debugging
To debug a Firebase function with VS Code,
-
Create a file
.vscode/launch.jsonwith the following contents..vscode/launch.json { "version": "0.2.0", "configurations": [ { "name": "Firebase: debug funcs", "type": "node", "request": "attach", "port": 9229, "restart": true, "skipFiles": ["<node_internals>/**"] }, ] } -
Add the following task to
.vscode/tasks.json..vscode/tasks.json { "version": "2.0.0", "tasks": [ { "label": "Firebase emulators: debug", "type": "shell", "command": "firebase emulators:start --inspect-functions --debug", "presentation": { "panel": "dedicated" } }, ... ] }Optionally, add a task button for this in
.vscode/settings.json..vscode/settings.json { "VsCodeTaskButtons.showCounter": false, "VsCodeTaskButtons.tasks": [ { "label": "🔥 Firebase Debug", "task": "Firebase emulators: debug" }, ... ] } -
Run the firebase emulator with the
--inspect-functionsflag -
Choose Firebase: debug funcs from the Run and Debug window in VS Code.
-
Click Start Debugging
-
Set a breakpoint somewhere in the function you want to debug
-
Invoke the function