Modelling the brick
All bricks should have the same width and height, and border-width, but they should all have different x and y positions. I declared w, h, and borderWidth as static fields on the Brick class, since we only need one instance for each of those properties.
class Brick {
  static w = 50;
  static h = 20;
  static borderWidth = 5;
  constructor(x, y) {
    this.x = x;
    this.y = y;
  }
}
Now that we know what a brick will look like, let's create a function that will create as many bricks as we specify. I find it simple to specify bricksAcross and bricksDown so that the function will generate a rectangle of bricks. We can make our function accept and offset from the wall in the x and y direction so that we can position the bricks wherever we want. Our function will return a matrix (two-dimensional array) of bricks.
function createBricks(bricksDown, bricksAcross, offset) {
  let matrix = [];
  for (var y = 0; y < bricksDown; ++y) {
    matrix[y] = [];
    for (let x = 0; x < bricksAcross; ++x) {
      let xPosition = x * Brick.w + offset.x;
      let yPosition = y * Brick.h + offset.y;
      matrix[y].push(new Brick(xPosition, yPosition));
    }
  }
  return matrix;
}
Let's use this function in setup to create some bricks. I intentionally made the canvas width of 500 easily divisible by the width of the bricks: 50. So in our case, we can easily get the number of bricks needed to fill the screen by dividing the canvas width by the bricks width. I chose to create 6 rows of bricks, and gave the bricks an offset of 50 in the y direction so that we have some room at the top of the screen for the score. Also, it's fun to bounce off the top of the ceiling into the top of the bricks. We can pass this information to our function createBricks and save the returned matrix to the bricks variable. Multiplying the matrix's number of columns by the number of rows will give us the total number of bricks.
// Put these with your globals
let bricks;
let totalBricks;
let brokenBricks;

function setup() {
  player = new Player();
  ball = new Ball(getCenter(player.x, player.w), player.y);

  let bricksAcross = width / Brick.w;
  let bricksDown = 6;
  let offset = {
    x: 0,
    y: 50
  }

  bricks = createBricks(bricksDown, bricksAcross, offset);
  totalBricks = bricks.length * bricks[0].length;
  brokenBricks = 0;

  gameOver = false;
  if (!initialized)
    requestAnimationFrame(initAnimation);
}
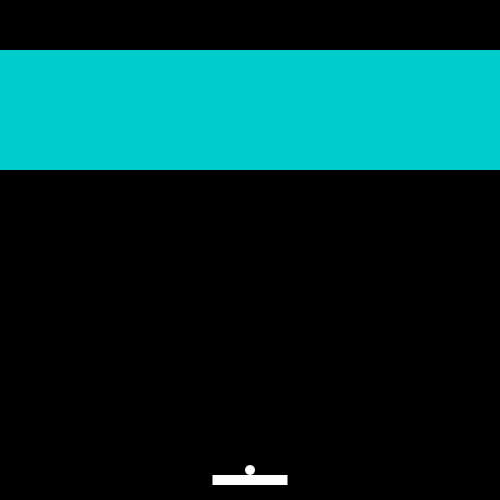
Now, let's render the bricks so we can see the fruits of our labor! First, we loop through the bricks and test whether or not the brick is defined. Soon, when we break the brick, it will appear as undefined in our matrix. We fill the brick with a light blue color.
function render() {
  // ...
  for (let i = 0; i < bricks.length; ++i) {
    for (let brick of bricks[i]) {
      // Forward thinking to when we remove bricks
      if (!brick) continue;

      ctx.fillStyle = "#0cc";
      ctx.fillRect(brick.x, brick.y, Brick.w, Brick.h);
    }
  }
}
I See a Big Blue Rectangle!
This is a good sign that all of the bricks are rendering, but we need to create a border around the bricks!

Adding a Border
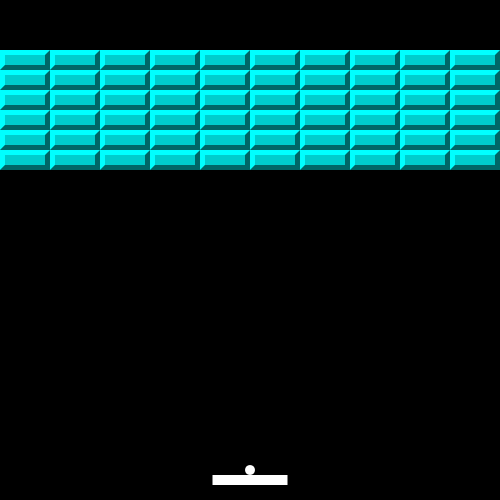
After drawing the rectangle, let's draw a 3D-looking border around the brick. We can accomplish this by using the path API to draw two polygons on top of the rectangle. In the top-left, it will be a lighter blue, and in the bottom-right it will be a darker blue to create the effect we want. We use the borderWidth property along with the x, y, w, and h properties to draw the pattern which looks like this:

function render() {
  // ...
  ctx.fillStyle = "#0cc";
  ctx.fillRect(brick.x, brick.y, Brick.w, Brick.h);

  // Top left polygon
  ctx.fillStyle = "#0ff";
  ctx.beginPath();
  ctx.moveTo(brick.x, brick.y + Brick.h);
  ctx.lineTo(brick.x + Brick.borderWidth, brick.y + Brick.h - Brick.borderWidth);
  ctx.lineTo(brick.x + Brick.borderWidth, brick.y + Brick.borderWidth);
  ctx.lineTo(brick.x + Brick.w, brick.y + Brick.borderWidth);
  ctx.lineTo(brick.x + Brick.w, brick.y);
  ctx.lineTo(brick.x, brick.y);
  ctx.closePath();
  ctx.fill();

  // Bottom right polygon
  ctx.fillStyle = "#066";
  ctx.beginPath();
  ctx.moveTo(brick.x, brick.y + Brick.h);
  ctx.lineTo(brick.x + Brick.borderWidth, brick.y + Brick.h - Brick.borderWidth);
  ctx.lineTo(brick.x + Brick.w - Brick.borderWidth, brick.y + Brick.h - Brick.borderWidth);
  ctx.lineTo(brick.x + Brick.w - Brick.borderWidth, brick.y + Brick.borderWidth);
  ctx.lineTo(brick.x + Brick.w, brick.y);
  ctx.lineTo(brick.x + Brick.w, brick.y + Brick.h);
  ctx.closePath();
  ctx.fill();
}

Looking Good!
Now it's time to break those bricks.
Collision Detection Between a Circle and a Rectangle
All of the code we are about to write should go at the bottom of the update function. First, we loop through our two-dimensional array of bricks, and for each brick, we will test if the ball has collided with it.
function update(dt) {
  // ...
  for (let i = 0; i < bricks.length; ++i) {
    for (let j = 0; j < bricks[i].length; ++j) {
      let brick = bricks[i][j];
      if (!brick) continue;
      // We are about to flesh this out
    }
  }
}
Many games approximate collisions with complex shapes. Pretending that our ball is a square for the sake of collision detection would be much faster, but it would not be as high-fidelity. Since the circle-to-rectangle collision algorithm is actually pretty simple, we're going to implement it!
-
Find which side of the brick is closest to the center of the ball - assuming that the center of the ball is outside of the brick.
// Determine which side of the brick is closest let right = ball.x > brick.x + Brick.w; let left = ball.x < brick.x; let bottom = ball.y > brick.y + Brick.h; let top = ball.y < brick.y; -
Then, use those sides to determine which vertex of the brick is closest to the ball. If no vertex is closest to the ball, it's because the ball is inside the brick, so we default the vertex's position to the center of the ball.
// Default vertex to ball x and y let vertex = { x: ball.x, y: ball.y }; // Choose the vertex which is closest if (right) vertex.x = brick.x + Brick.w; else if (left) vertex.x = brick.x; if (bottom) vertex.y = brick.y + Brick.h; else if (top) vertex.y = brick.y; -
When we calculate the distance between that vertex and the center of the ball, if the radius is smaller than the distance, there has been a collision! Otherwise, there is no collision and we can carry on to the next iteration of the loop.
const a = (ball.x - vertex.x) * (ball.x - vertex.x);
const b = (ball.y - vertex.y) * (ball.y - vertex.y);
const c = ball.r * ball.r;
const collision = a + b < c;
Collision Handling
Detecting a collision is not enough - we must figure out how to handle it! The first thing we know is that we just broke this brick - we are trying to breakout after all. Remember how we check if (!brick) in our renderer and before our collision detection code that we just wrote? Well, 0 always evaluates to false in JavaScript. You could set the brick to false or undefined if you prefer. So instead of this element in the array holding our Brick object, it now holds 0.
if (collision) {
  bricks[i][j] = 0;
  ++brokenBricks;
  // the next two snippets go here
}
Let's continue inside this if statement. If the number of brokenBricks is equal to the number of totalBricks, we should set gameOver to true and not bother continuing on in the update function.
// If all bricks have been cleared, the player won!
if (brokenBricks == totalBricks) {
  gameOver = true;
  return;
}
If the game isn't over - and it usually won't be - we want to bounce the ball off the brick, right? Let's take a crack at a simple algorithm for that. If the ball has hit the top or bottom of the brick, we can reverse the velocity in the y direction. If the ball hit the right or left side, we should reverse the x component of the velocity.
if (top || bottom) {
  ball.velocity.y *= -1;
}
if (right || left) {
  ball.velocity.x *= -1;
}
If you play the game like this for any length of time, you will see some pretty crazy behavior! Try to hit the corners. Currently, we are not taking the velocity into account when reversing the velocity, so if the ball hits the top-left corner with some velocity carrying it upward, we wouldn't expect the ball to turn around and fall downward, but that's one example of how this can go wrong. Also, we need to consider whether the brick has any neighbors to determine how the corner should behave. So let's throw the above code away and start all over again.
Let's first see if there are any neightbors in the cardinal directions. The first condition in these if statements test to see if we are about to check outside the bounds of the array. If we aren't checking out of bounds, then we can index into that neighboring element to see if there is a brick there, or if it is empty.
let neighbors = {}; // determine if there are bricks on any sides
if (i-1 >= 0               && bricks[i-1][j] !== 0) neighbors.top    = true;
if (i+1 < bricks.length    && bricks[i+1][j] !== 0) neighbors.bottom = true;
if (j-1 >= 0               && bricks[i][j-1] !== 0) neighbors.left   = true;
if (j+1 < bricks[i].length && bricks[i][j+1] !== 0) neighbors.right  = true;
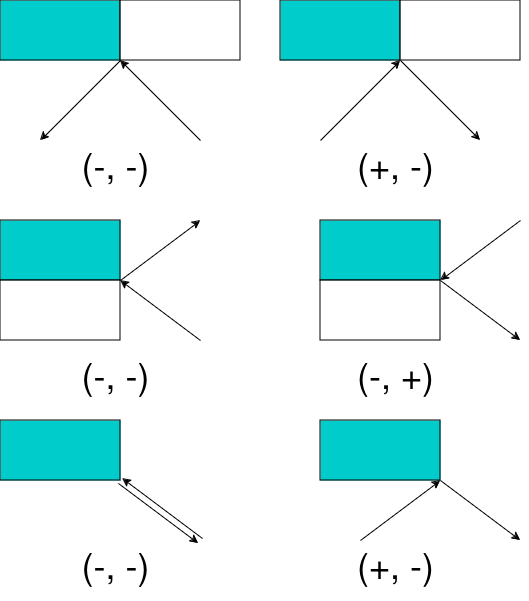
Now it's time for some logic. We consider the corner that was hit: let's take the bottom-right for example. I drew this diagram to explain how the neighbors and velocity factor into our calculations. A picture is worth a thousand words, right? The teal brick is the one we are considering the collision on. The white brick is acting as a neighboring brick.

Let's translate this logic into code. If the x velocity is negative and there isn't a neighbor to the right, we can reverse the velocity. the same is applicable for the y velocity, only we are considering the bottom neighbor.
if (right && bottom) { // -, -
  if (ball.velocity.x < 0 && !neighbors.right)  ball.velocity.x *= -1; //+
  if (ball.velocity.y < 0 && !neighbors.bottom) ball.velocity.y *= -1; //+
}
I'll extend the logic for the remaining corners without drawing a diagram to explain it, but I did add comments with + and - signs to signify the velocity direction. Now is also a good time to add our previous logic that we threw away in the case that only a single edge - not a corner - is touching.
if (right && bottom) { // -, -
  if (ball.velocity.x < 0 && !neighbors.right)  ball.velocity.x *= -1; //+
  if (ball.velocity.y < 0 && !neighbors.bottom) ball.velocity.y *= -1; //+
} else if (right && top) { // -, +
  if (ball.velocity.x < 0 && !neighbors.right)  ball.velocity.x *= -1; //+
  if (ball.velocity.y > 0 && !neighbors.top)    ball.velocity.y *= -1; //-
} else if (left && bottom) { // +, -
  if (ball.velocity.x > 0 && !neighbors.left)   ball.velocity.x *= -1; //-
  if (ball.velocity.y < 0 && !neighbors.bottom) ball.velocity.y *= -1; //+
} else if (left && top) { // +, +
  if (ball.velocity.x > 0 && !neighbors.left)   ball.velocity.x *= -1; //-
  if (ball.velocity.y > 0 && !neighbors.top)    ball.velocity.y *= -1; //-
}
// Exclusively a single edge touching
else {
  if (right || left) {
    ball.velocity.x *= -1;
  }
  else if (top || bottom) {
    ball.velocity.y *= -1;
  }
}
Now that we handled the collision, we can break out of both for loops so that only one collision can happen per frame. The easiest way to do this is to name our outer loop "loop", and supply that name in the break statement like so: break loop;. We just wrote a ton of code! So I'm going to put the entire ball-hits-brick collision detection and handling logic here to make sure we are on the same page.
function update(dt) {
// ...
loop
for (let i = 0; i < bricks.length; ++i) {
    for (let j = 0; j < bricks[i].length; ++j) {
      let brick = bricks[i][j];
      if (!brick) continue;

      // If the following "if" statements fail, the circle is inside the rectangle
      // Default vertex to ball x and y, so that the collision will return true
      let vertex = {
        x: ball.x,
        y: ball.y
      };

      // Determine which side of the brick is closest
      let right  = ball.x > brick.x + Brick.w;
      let left   = ball.x < brick.x;
      let bottom = ball.y > brick.y + Brick.h;
      let top    = ball.y < brick.y;

      // Choose the vertex which is closest
      if (right)     vertex.x = brick.x + Brick.w;
      else if (left) vertex.x = brick.x;
      if (bottom)    vertex.y = brick.y + Brick.h;
      else if (top)  vertex.y = brick.y;

      // Collision if distance from center of circle is less than the radius of the circle
      const collision = (ball.x - vertex.x) * (ball.x - vertex.x) + (ball.y - vertex.y) * (ball.y - vertex.y) < ball.r * ball.r;

      if (collision) {
        bricks[i][j] = 0;
        ++brokenBricks;

        // If all bricks have been cleared, the player won!
        if (brokenBricks == totalBricks) {
          gameOver = true;
          return;
        }

        let neighbors = {}; // determine if there are bricks on any sides
        if (i-1 >= 0               && bricks[i-1][j] !== 0) neighbors.top    = true;
        if (i+1 < bricks.length    && bricks[i+1][j] !== 0) neighbors.bottom = true;
        if (j-1 >= 0               && bricks[i][j-1] !== 0) neighbors.left   = true;
        if (j+1 < bricks[i].length && bricks[i][j+1] !== 0) neighbors.right  = true;

        // Set the velocity if it hits a corner based on the velocity and if there is a neighbor
        // Otherwise we get the bizzare behavior of bouncing off a corner of the block regardless
        // whether another block is next to it or not.
        if (right && bottom) { // -, -
          if (ball.velocity.x < 0 && !neighbors.right)  ball.velocity.x *= -1; //+
          if (ball.velocity.y < 0 && !neighbors.bottom) ball.velocity.y *= -1; //+
        } else if (right && top) { // -, +
          if (ball.velocity.x < 0 && !neighbors.right)  ball.velocity.x *= -1; //+
          if (ball.velocity.y > 0 && !neighbors.top)    ball.velocity.y *= -1; //-
        } else if (left && bottom) { // +, -
          if (ball.velocity.x > 0 && !neighbors.left)   ball.velocity.x *= -1; //-
          if (ball.velocity.y < 0 && !neighbors.bottom) ball.velocity.y *= -1; //+
        } else if (left && top) { // +, +
          if (ball.velocity.x > 0 && !neighbors.left)   ball.velocity.x *= -1; //-
          if (ball.velocity.y > 0 && !neighbors.top)    ball.velocity.y *= -1; //-
        }
        // Exclusively a single edge touching
        else {
          if (right || left) {
            ball.velocity.x *= -1;
          }
          else if (top || bottom) {
            ball.velocity.y *= -1;
          }
        }

        // stop checking collisions once one is found.
        break loop;
      }
    }
  }
}
Performance Consideration
What if we have a low framerate and the center of the ball ends up inside a brick? Our collision detection algorithm will catch that case, but we won't be able to determine which direction to send the ball. We will tackle this issue and add polish in the next chapter.
